Creating & managing jobs
Managing and creating jobs
GS RichCopy 360 offers a simple yet intuitive design that makes it easy to manage and create jobs. All the options are available in a single viewer pane so that any options can be easily selected. Moreover, our job setup wizard can walk the user through the most commonly used options.
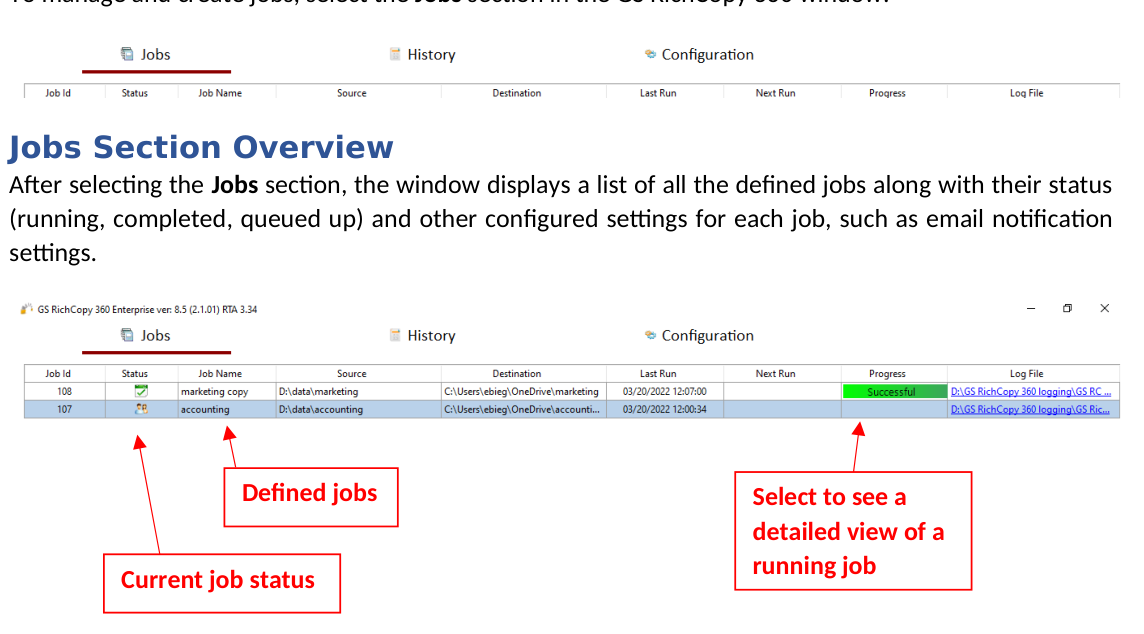
To manage and create jobs, select the Jobs section in the GS RichCopy 360 window.
Jobs Section Overview
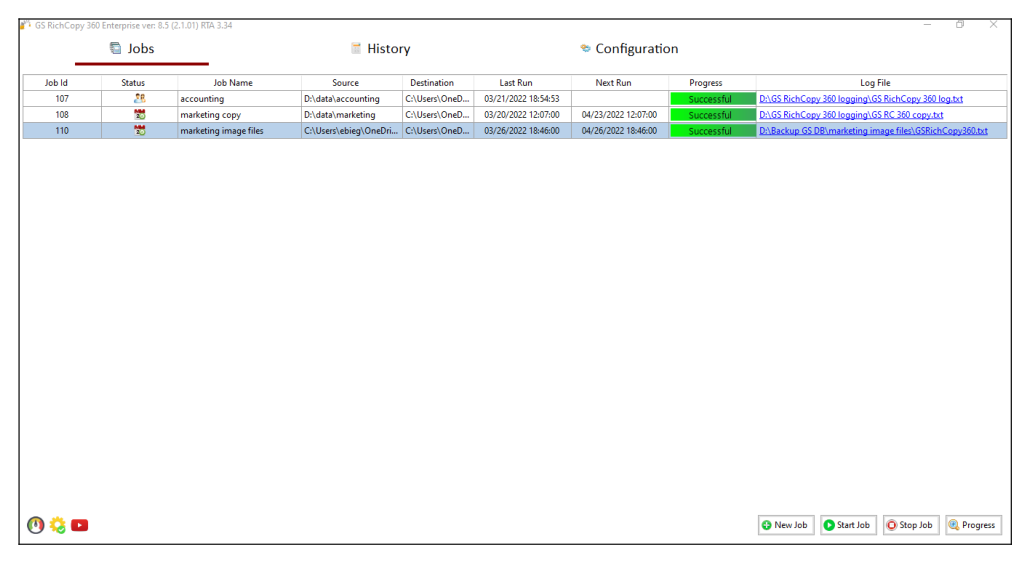
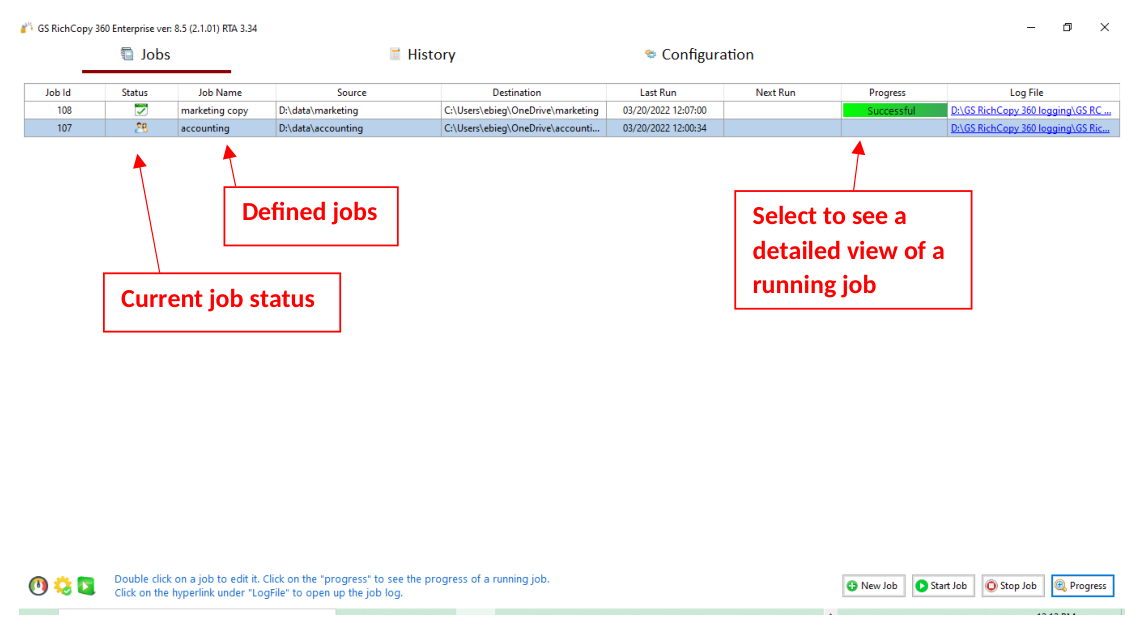 After selecting the Jobs section, the window displays a list of all the defined jobs along with their status (running, completed, queued up) and other configured settings for each job, such as email notification settings.
Select to see a detailed view of a running job
Current job status
Defined jobs
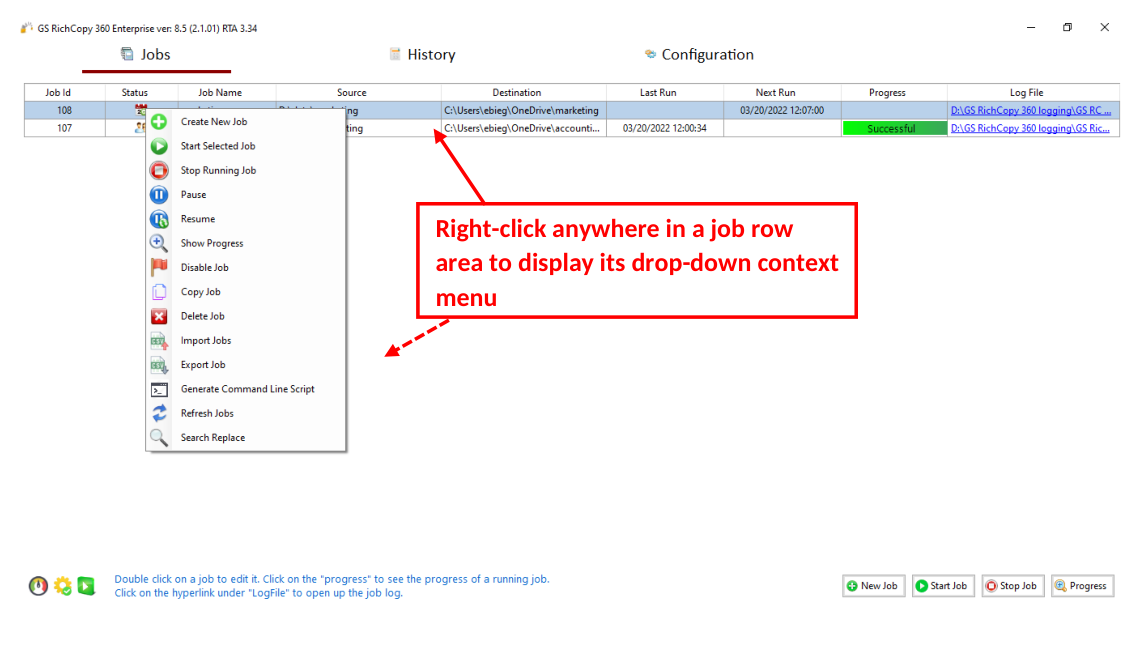
To highlight a job, select the specific job and right-click to choose an option from the drop-down menu to control the job. You may right-click the job to initiate the same actions in addition to copying an existing job.
Right-click anywhere in a job row area to display its drop-down context menu
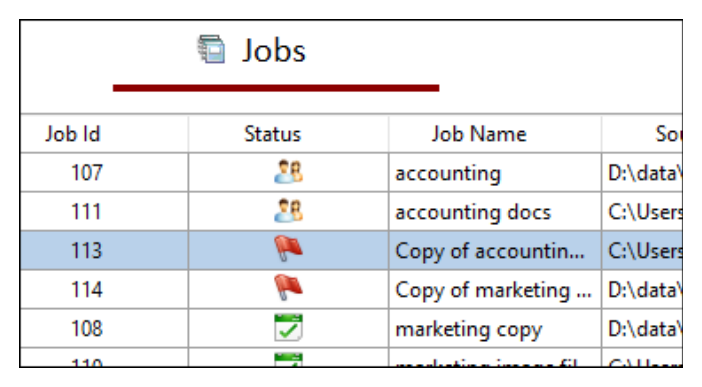
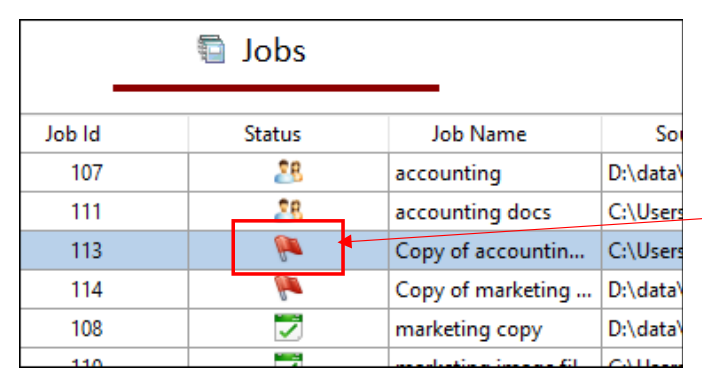
Tip: To duplicate an existing job, right-click the job you want to duplicate and select Copy Job from the drop-down menu. This will create an exact copy of the job but in a disabled state. The new copy will have the same name as the original job but will be preceded with Copy of in the job name.
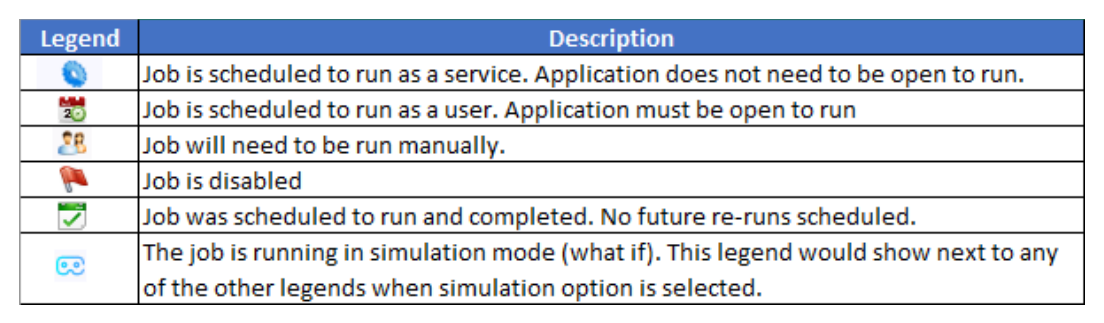
Job Status Legend
The status of each job is shown in the Status column of the user interface. Users can easily identify the status of a job by looking at the presented icon corresponding to a specific job. Below are the available icons and their corresponding descriptions.
Job Progress Indicators
Because jobs run independently of one another, each job is presented with its own progress bar. The progress bars display a job’s current state, or its recent completion result in the event it is no longer running.
As the progress bar runs, it will show green if it does not encounter errors (![]() ). If it encounters a warning, it will change to orange, then turns red if it encounters any errors. This is useful if there are multiple jobs running and an administrator is performing a quick check on the status of the jobs. If the job indicators all show green, it is an indication that everything is running without error.
). If it encounters a warning, it will change to orange, then turns red if it encounters any errors. This is useful if there are multiple jobs running and an administrator is performing a quick check on the status of the jobs. If the job indicators all show green, it is an indication that everything is running without error.
| STATE | DESCRIPTION |
|---|---|
| Running | Job is gathering all the information to start the job operation. The gathering process is fully multi-threaded. |
| Stopped | The job has been terminated by the user or by some other intervention (Service stopped, etc.). |
| Error | Job experienced a problem. This could mean it completed with errors or it did not fully complete (i.e. target is full; source or target is down). |
| Queued | Job is waiting in line for its turn to run. Check Max Allowed Concurrent Job Execution in the event it reached its limit at the current state. |
| Completed/Successful | Job has completed successfully with no errors to report. |
| Progress % | As the job runs, the percentage of the progress is displayed showing the overall progress of the job. Click it to see the full details regarding its progress. Users can see the detailed progress for individual jobs by clicking the Progress button at the bottom part of the window. |
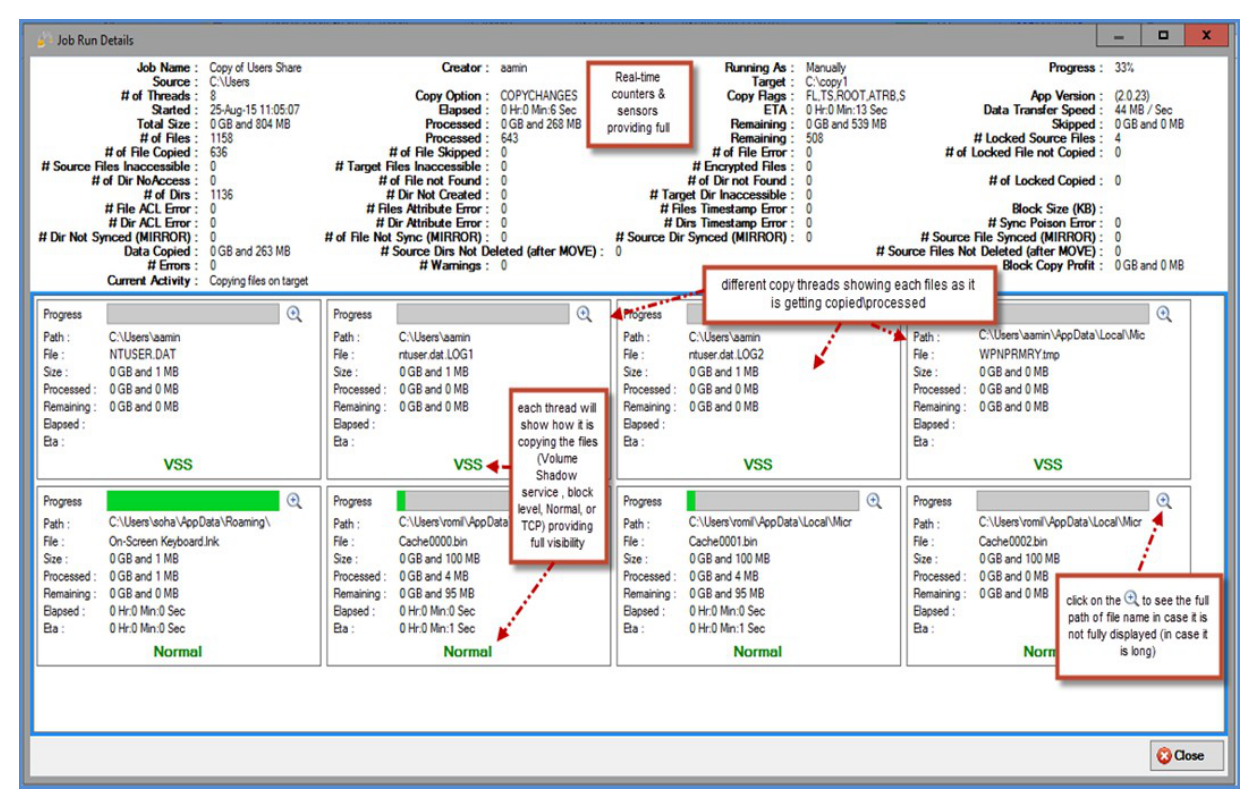
Job Run Details Screen
When a job is shown in a running state in the main Jobs window, users can select the progress bar (![]() ) next to a running job or click the Progress button at the bottom-right of the Jobs window to see the full details of a job’s progress. If a job is set to multi-thread (highly recommended), each copy thread and its progress will be shown as well.
) next to a running job or click the Progress button at the bottom-right of the Jobs window to see the full details of a job’s progress. If a job is set to multi-thread (highly recommended), each copy thread and its progress will be shown as well.
Copy Job Configuration Window
 GS RichCopy 360 offers a single view pane, the Copy Job Configuration window, when viewing an existing job, modifying an existing job, or creating a new job without the job wizard (for advanced users). The window is very rich in terms of features and options, while being simple and intuitive.
You can access the Copy Job Configuration window in two different ways:
-
Double-clicking on an existing job or selecting the edit button () corresponding to that specific job.
-
Creating a job using a blank job’s details. This option is selected using the Job Schedule Wizard. For more information, refer to Using the Job Schedule Wizard.
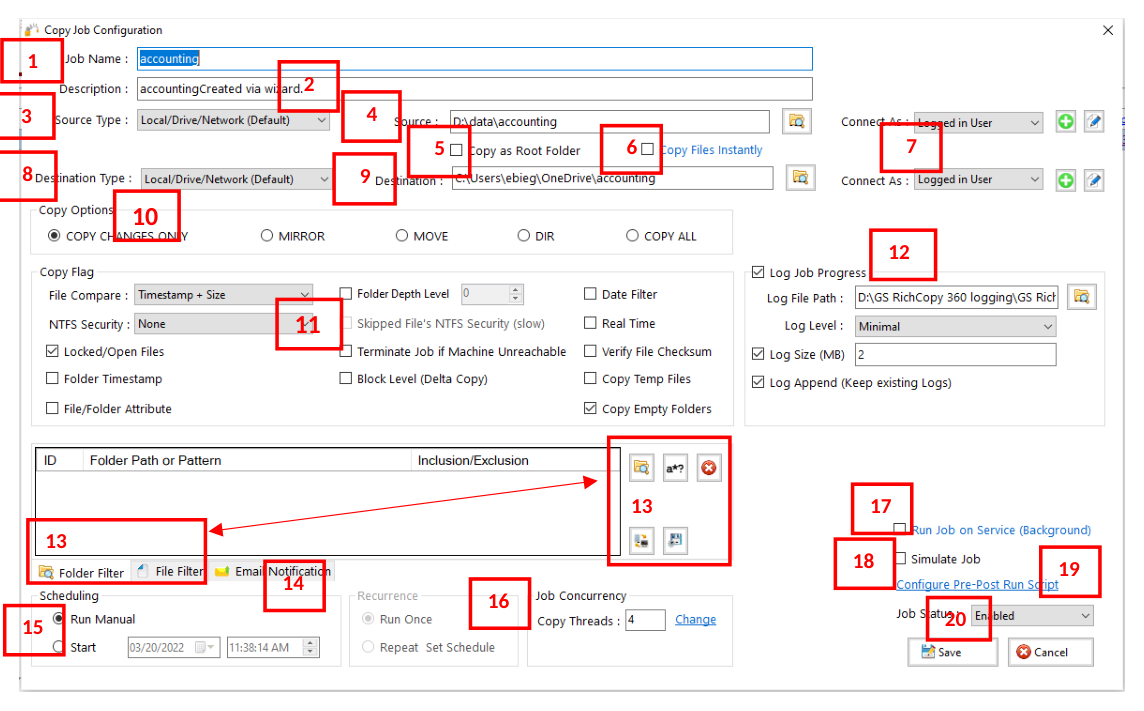
The following section describes the items displayed in the Copy Job Configuration window.
1 – Job Name
The Job Name is used to identify the job. The name must be unique and descriptive, such as Accounting Data or Copy Email Archive, so that other users or administrators can understand the purpose of the job. Job names are referenced in the Job Status section and in email notifications (if turned on).
2 – Description
The Description field is available to enter a meaningful description for a job as it may be helpful to determine the purpose of a job in a situation where there may be two similarly named jobs.
3 – Source Type
The available source types vary between the Enterprise and the Standard version of the GS RichCopy 360 application.
Enterprise Version
The available source types in the GS RichCopy 360 Enterprise version consist of the following choices:
-
Local Drive/Network (Default)
-
Azure File Share
-
WebDAV
-
Azure Blob
-
OneDrive/SharePoint
-
Amazon S3 Storage
-
S3 compatible Storage
-
Box
-
Dropbox
-
Google Drive
-
FTP/SSL
-
SFTP
For more information on working with cloud sources see Example Section E - Copying to the Cloud
Standard Version
The available source types in the GS RichCopy 360 Standard version are local and network drives including FTP/SFTP, and file shares hosted on Windows or NAS devices.
4 – Source
The is the path of the folder from where you want to copy. The source will always point to a folder and not to a file.
If your source is a cloud source, you will need to create a Connect As account prior to specifying the source in this field.
Note: The Path variable is supported in this field. For more information, refer to Example Section K - Environment Variables
5 – Copy as Root Folder
If the Copy as Root Folder option is selected, it will create the source root folder and its contents in the destination folder. If this is not selected, it will copy only the contents of the root folder to the destination.
6 – Copy Files Instantly
If you enable this option, GS RichCopy 360 will start the replication or movement before it calculates the total amount of data being replicated or moved. The progress percentage bar will automatically adjust upwards or downwards until the total calculation is complete. We recommend this option if the source has more than 500,000 files and folders or the source has high latency. Disabling this option may slow the start of the replication or movement but will provide a more accurate percentage from the beginning.
7 – “Connect As” for Source and Destination
 This is the area where account information can be provided to assist with connecting to the specified selection in the Source and Destination fields.
The Enterprise version of GS RichCopy 360 allows for login information to be specified for various cloud providers. While the Standard version allows for login information for local and network drives including FTP/SFTP, and file shares hosted on Windows or NAS devices.
Note that the Connect As screens will vary based on the Source and Destination type selected. For additional information on Connect As accounts, refer to Creating Connect As Accounts
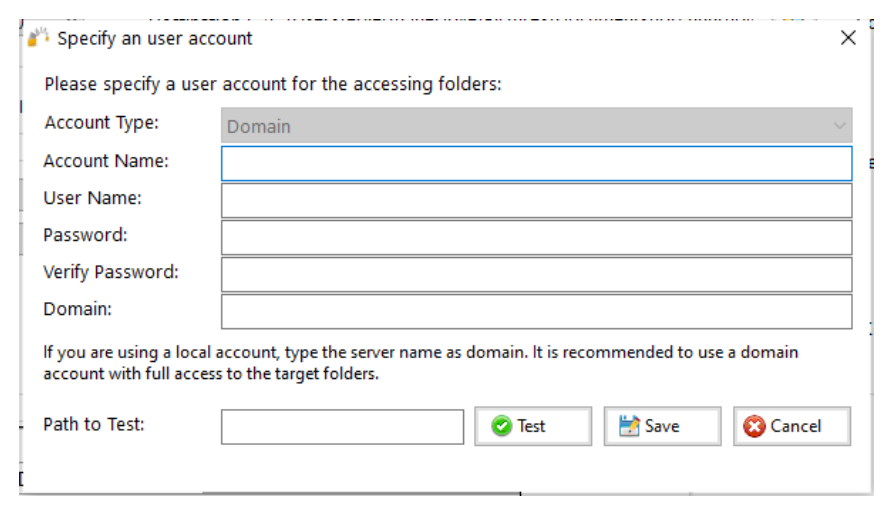
When the Source or Destination is a Local or a Network account, the following screen will be displayed:
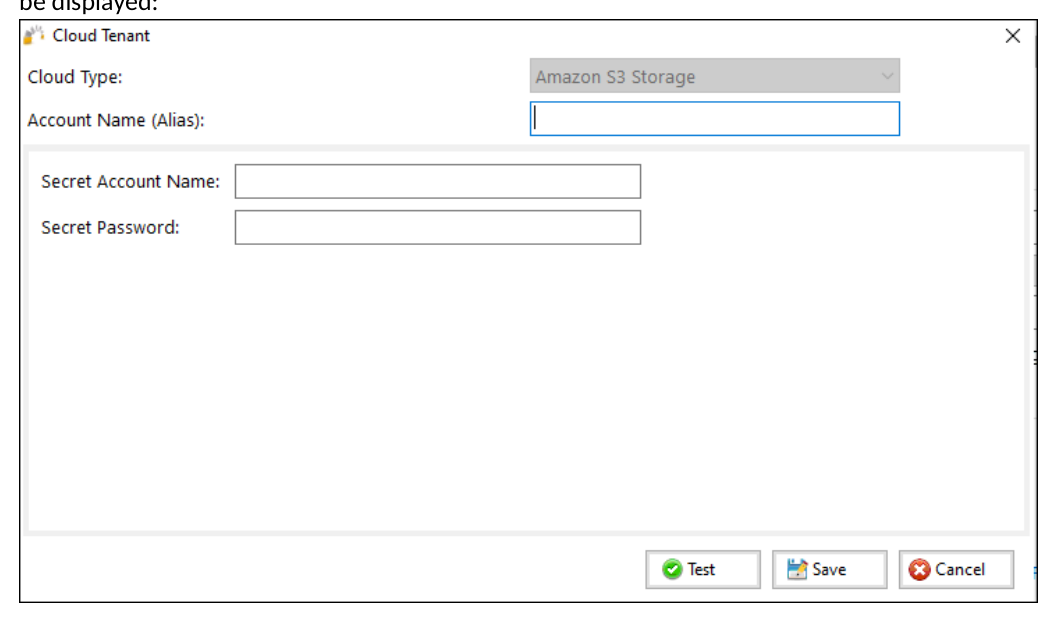
When the Source or Destination is a cloud tenant, such as Amazon S3 Storage, the following screen will be displayed:
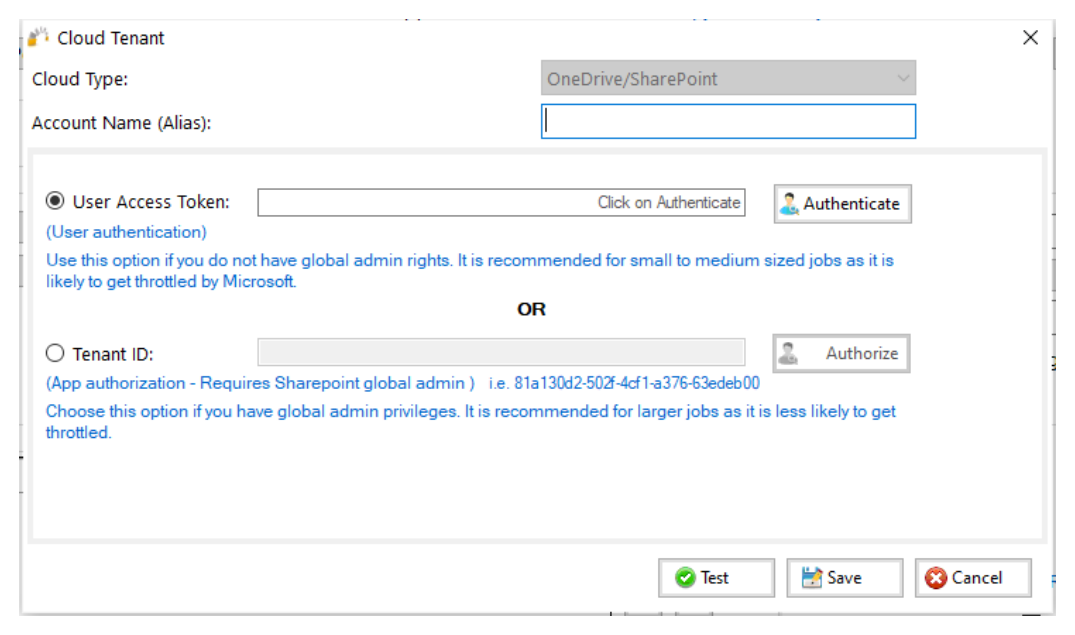
When the Source or Destination is OneDrive/SharePoint, the following screen will be displayed:
8 – Destination Type
The available destination types vary between the Enterprise and Standard version of the GS RichCopy 360 application.
Enterprise Version
The Enterprise version of GS RichCopy 360 supports the following destination types:
-
Local Drive/Network (Default)
-
TCP/RTA — The user can specify a specific port (by default it uses TCP 8008) to transmit data. This option requires a few additional configuration settings, in addition to the installation of a light RTA (Remote Transfer Agent) on the destination computer.
-
Azure File Share
-
WebDAV
-
Azure Blob
-
OneDrive/SharePoint
-
Amazon S3 Storage
-
S3 compatible Storage
-
Box
-
Dropbox
-
Google Drive
-
FTP/SSL
-
SFTP
Standard Version
There are two ways to copy data in the Standard version of GS RichCopy 360:
-
Normal — uses SMB to copy data, such as that on \192.168.0.11\, share, or a local drive, such as D:\target.
-
Cloud — Use this option when you will be copying to a cloud destination. You will also need to configure the Connect As area with the associated account credentials. Note that more cloud providers are in the enterprise version.
The destination is the path of the folder where you want to copy to. This folder will be created if it does not already exist. If the user is using the TCP option of copying data, a job serial number is presented instead of a destination path prompt. For more information, refer to Creating a TCP Copy Job (Enterprise)
Note: The Path variable is supported in this field. For more information refer to Example Section K: Environment Variables.
If the user is using the TCP option of copying data, a job serial number is presented instead of a destination path prompt. For more information refer to Creating a TCP Copy Job (Enterprise).
9 – Destination
The destination is the path of the folder where you want to copy to. This folder will be created if it does not already exist. If the user is using the TCP option of copying data, a job serial number is presented instead of a destination path prompt. For more information, refer to Jobs are created as Enabled by default. This means they can be run on demand or as scheduled jobs. Jobs that are set to disabled will NOT run on demand or as scheduled.
If a job is duplicated or copied, the duplicated job will be set to Disabled by default.
10 – Copy Options
The following are the copy options that you can use:
-
Copy Changes Only—copies only files and folders that are new or modified from the source to destination (Deltas only). This option will not delete files from the destination if they do not match in the source. If the destination has the same files, those files will be skipped.
-
Mirror—mirrors the destination to the source.
Note: If a file is deleted from the source, it will be also be deleted from the target.
-
Move—moves files and directories (delete from source after copying).
-
DIR—copies only the directory tree structure.
-
Copy All—copies all files and folders from source to destination (i.e. overwrite files and folders that match in the destination). This option will overwrite any duplicates of those in the source.
11 – Copy Flag
The following are the available copy options which can be selected:
-
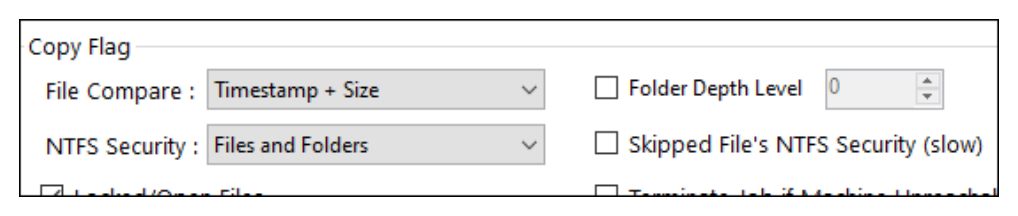
File Compare—sets the file comparison element to compare whether a file in the source and destination match or if it needs to be overwritten in the destination. The following are the options:
-
Timestamp + Size — the comparison uses the last-modified timestamp and the file size. If both, the modified timestamp and file size match, the file will be skipped. If one of the two options returns a mismatch, the source file is copied to the destination.
-
Modified Timestamp—comparison is determined by the last-modified time stamp.
-
File Size — comparison is determined by the file size
-
Skip if Destination is Newer — if the destination file is newer, it will not be overwritten.
-
Copy Only Newly Created Files — only newly created files will be copied to the destination.
-
NTFS Security—copies all NTFS security permissions, including inheritance blocking and advanced ACL settings. If the destination file or folder matches the source except for the NTFS security settings, only the security settings will be replicated over, and it will not trigger a retransmission of the entire file or folder.
Example: If a Word document exists in both source and destination but the permissions are different, GS RichCopy 360 would detect that the files are identical, and it would just replicate the permissions to the destination so that they are completely the same.
-
None (default)–No NTFS comparison activity in the copy process.
-
Folder Only (recommended)—If the destination folder matches the source except for the NTFS security settings, only the security settings will be replicated over, a retransmission of the entire folder will not occur. Ensure that NTFS permissions set on the folders in the destination match permissions set in the source as electing this option may increase the duration of the job while it compares the NTFS permission between folders.
-
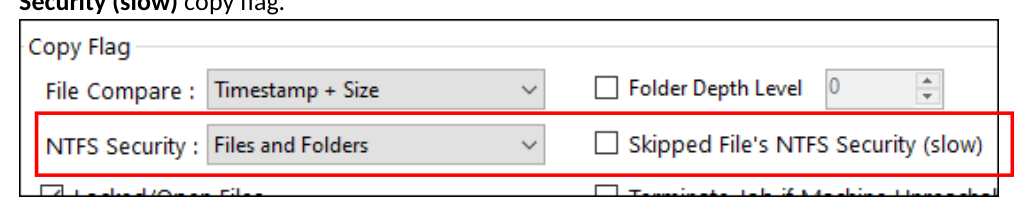
Files and Folders—If the destination files and folders match the source except for the NTFS security settings, only the security settings will be replicated over, a retransmission of files and folders will not occur.
Ensure that NTFS permissions set on the files and folders in the destination match permissions set in the source. While setting NTFS permissions on a file is not a recommended practice, this option is available and triggering it may increase the duration of the job while it compares the NTFS permission of every file.
Note that this option must be selected if you also want to enable the Skipped File’s NTFS Security (slow) copy flag.
- Locked/Open Files—if checked, this option copies locked and open files through VSS (Volume Shadow Service) integration. For the open file copy to work properly, the source has to be on the local computer since GS RichCopy 360 will work seamlessly with VSS to copy the locked or open files.
Note: there may be a locked/open file limitation in some cloud storage environments as those may be imposed by a cloud provider as part of their available feature set/platform.
- Folder Timestamp–if this option is selected, the last modified date will be preserved.
Note: there may be a folder timestamp limitation in some cloud storage environments as those may be imposed by a cloud provider as part of their available feature set/platform.
- File/Folder attribute–when selected, file and folder attributes will be synchronized from source to the destination. If the destination file or folder matches the source except for the attributes, only the attribute settings will be copied over, and a retransmission of the entire file will not occur.
Note: there may be a folder attribute limitation in some cloud storage environments as those may be imposed by a cloud provider as part of their available feature set/platform.
- Folder Depth Level—by default, GS RichCopy 360 copies all folders from the source to destination. Enabling this option instructs GS RichCopy 360 to copy a certain folder depth to the destination. System administrators may enable this option and choose the level of folder depth.
Once the checkbox for this option is selected, the depth level counter will be enabled to allow for a selection.
Example: If the Dir Depth Level option is enabled and set at 2 as shown in the image below, GS RichCopy 360 will just copy a folder depth of 2 to the destination.
| SOURCE | DESTINATION |
|---|---|
| E:\DOCS\doc01\paper01\ | .\DOCS\doc01 |
| E:\DOCS\doc02\paper02\ | .\DOCS\doc02 |
Skipped Files NTFS Security (Slow) – For this option to be selectable, the NTFS Security copy flag of Files and Folders must first be selected. Otherwise, this option will appear as grayed-out.
-
Terminate Job if Machine Unreachable—highly useful in the event the source or destination machines are unreliable. If this option is selected, GS RichCopy 360 will continue to attempt to copy files instead of timing out. This option can be useful when copying across high latency links or over strained or unreliable WAN connections.
-
Block Level (Delta Copy)—select this option to enable or disable byte-level replication.
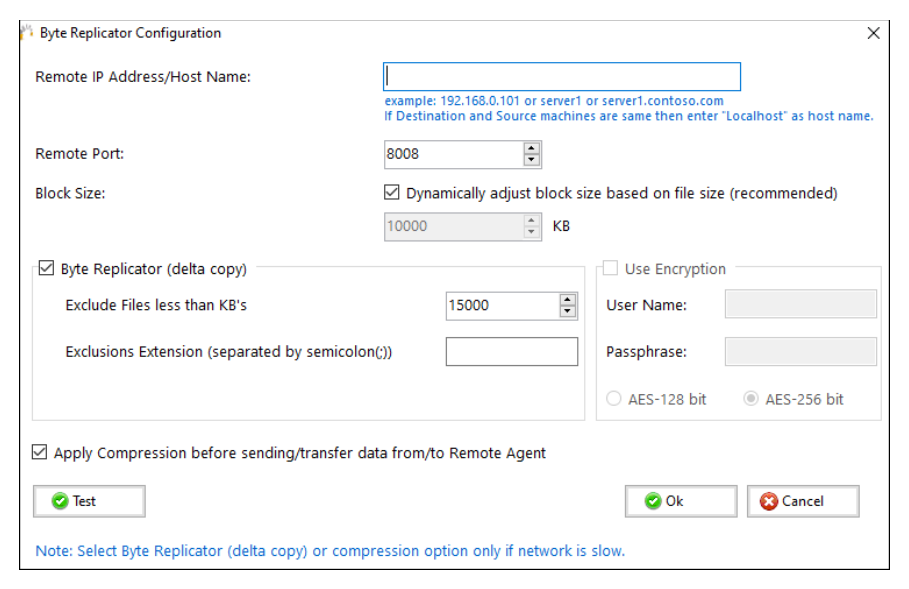
Byte level replication allows to only transfer the changed data in a file when synchronizing, instead of the entire file. This is useful in saving bandwidth especially when dealing with large file sizes.
Note: This option is available only in GS RichCopy 360 Enterprise.
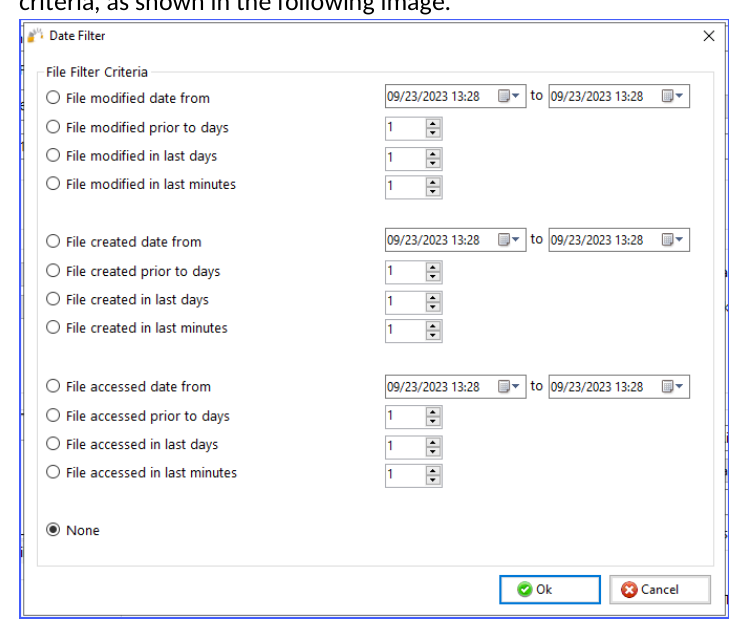
- Date Filter—provides the option to copy or move files whose last modified, created, or accessed date are before or within the specified number of days. A date range can also be set as a date filter. Files not matching the date criteria will be excluded. Date filters will not be applied to folders. Once this feature is selected, the user is presented with different options to set the filter date criteria, as shown in the following image.
-
Real-time—if this option is selected, the job will monitor changes to files in real-time and use these changes as triggers for file synchronization. If selected, the user will be presented with a configure option to monitor files ACL and attribute changes. Additionally, there is an option to exclude or include specific file extensions to be used in real-time replication. Note that this option is only available in GS RichCopy 360 Enterprise edition.
-
Verify File Checksum—select option to verify source file checksum with target file checksum. When this option is selected, a checksum compare is done for every file that is copied. Should there be a checksum mismatch between source file and destination file, then an error is raised in the job log and the job would continue but raise an failed status.
-
Copy Temp Files—if this option is selected, GS RichCopy 360 skips temporary files by default. System administrators may enable this option to copy temporary files if they deem it is necessary. The following files are deemed as temporary files by Microsoft. Usually, there is no need to copy them:
-
desktop.ini—a hidden file used to store information about the arrangement of a Windows folder. Essentially, if the layout or settings for a folder are changed, a desktop.ini file is automatically generated to save those changes.
-
thumbs.db files—the hidden file thumbs.db is a database file containing a small JPEG representing each of the thumbnails in a folder. Thumbs.db files are required by Windows to display a thumbnail for each icon. They are created automatically in the same directory as the thumbnails being viewed.
-
Temp files—several files may appear on the drive; these files will be in various directories beginning with a tilde character (~) and ending with a (.tmp) extension. These may be temporary files created by Windows that remain on the drive due to an irregular exit from a Windows session.
12 – Logging
The following options are available for the purpose of fine tuning the job log file creation process.
-
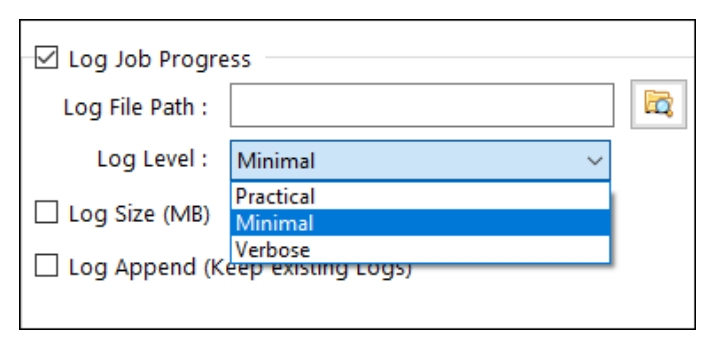
Log Job Progress—job progress is placed in a log file, and this is where you specify the location of the log file.
-
Log File path—type a path or browse to the folder where you want the log file to be placed.
Note: The Path variable is supported in this field. For more information, refer to Example Section K: Environment Variables.
-
Log Level—there are 3 types of log levels:
-
Practical
-
Minimal
-
Verbose—lists files that were skipped and copied to their own logs in the same folder containing the log.
-
Log Size (MB)—if a number is specified (in MB), and once the log file size reaches that limit, the job will start logging to a new file. However, the job will continue to run. This option is useful to avoid large log files.
-
Log Append (Keep existing logs)—if a log file already exists, logging will just append to the file instead of overwriting it.
Note: If a path is not specified, it will default to c:\gsrichcopy360logs\jobname\gsrichcopy360.log
13A – Folder Inclusion and Exclusion
Depending on the copy job, it is not uncommon to exclude specific subfolders or files from the copy job or the opposite when you want to copy specific folders or files and exclude everything else. The sections below explain the inclusion and exclusion of folders and files. It is important to note that folders and files have their sections, but they behave similarly.
Note: Filters on files and folders are not available in Mirror jobs going to the cloud.
Example procedure based on absolute path
 Example procedure based on absolute path
If you have a set folder that you know that you want to be excluded or included, follow the procedure below.
-
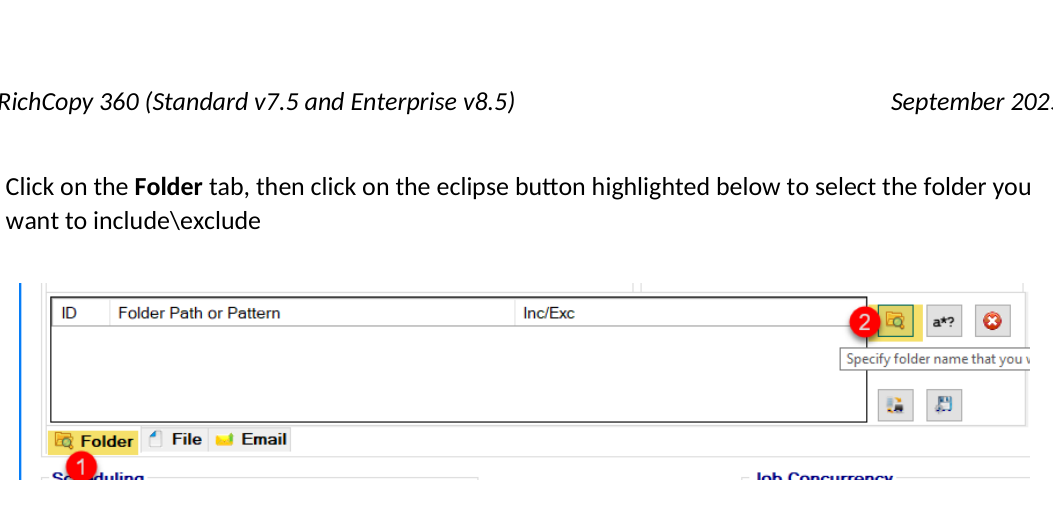
Click on the Folder tab, then click on the eclipse button highlighted below to select the folder you want to include\exclude
-
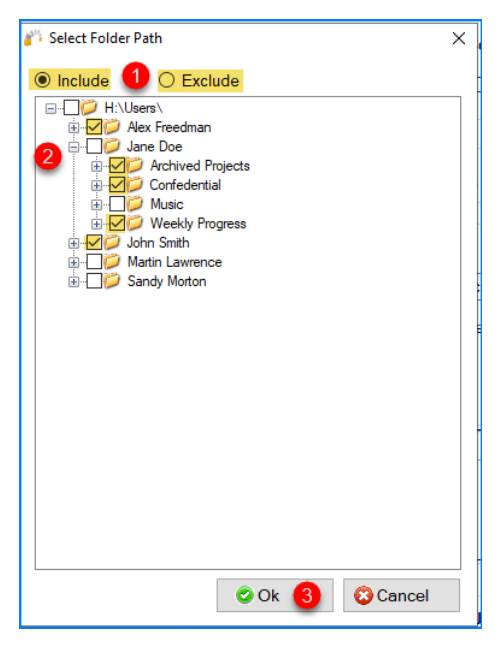
Choose whether you want to include or exclude folders and then select those folders. The selected folders do not need to be in the same level. You could include\exclude folders in one level and drill down to other folders and include\exclude them.
Example procedure based on wildcard, name, and pattern
In most scenarios, you would either want to include or exclude. However, there are times where you may want to include some folder but exclude some subfolders. Don’t worry; it’s possible. You can select all the folders you want to include and exclude and click OK. Then set the ones you want to exclude as per the example screen below:
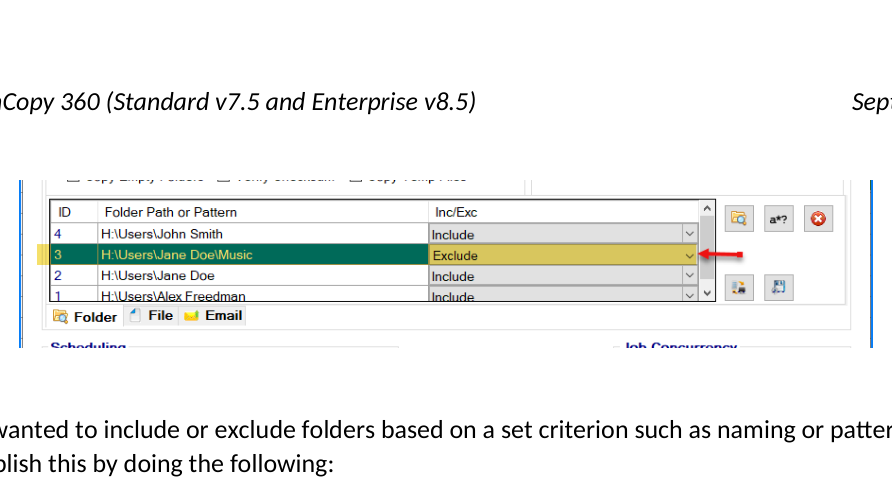
If you wanted to include or exclude folders based on a set criterion such as naming or pattern, you can accomplish this by doing the following:
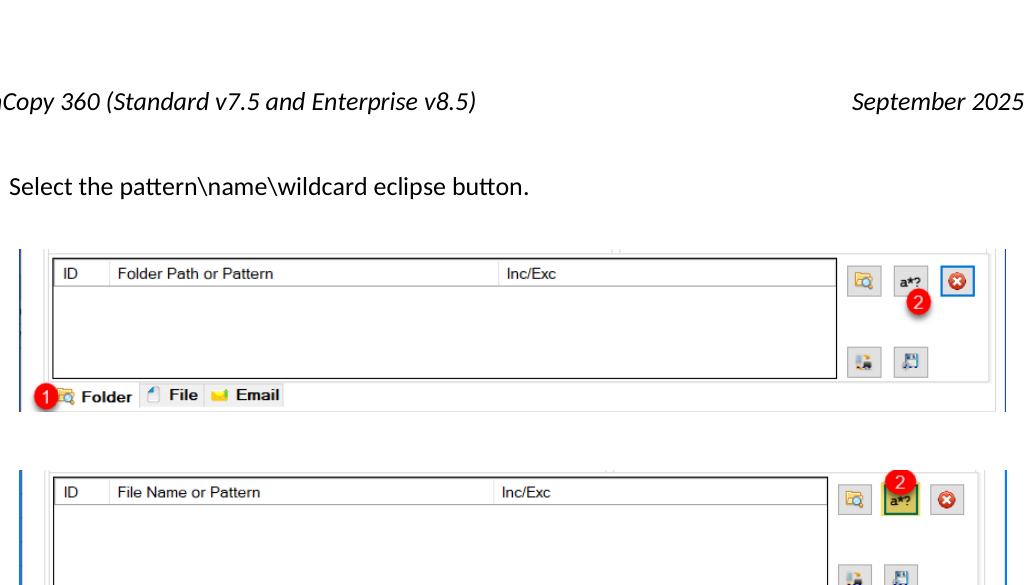
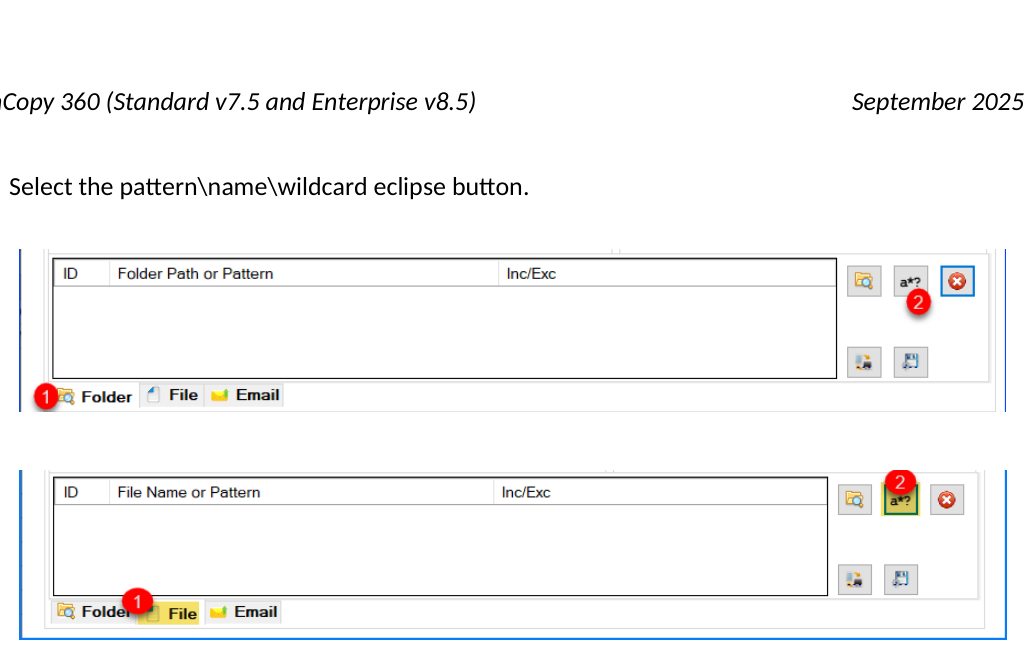
- Select the pattern\name\wildcard eclipse button.

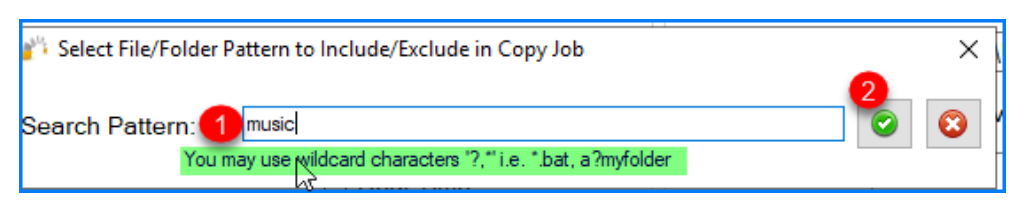 2. Type the name, pattern, or wildcard as per below. There are several scenarios:

 1. Specify an Exact match: In the scenario below, we are stating that any folders named “Music” would match.

This would copy any folders with the exact name music and not copy the folder named My Music or Music Files.
- Pattern: In this scenario, we specify the condition to start with “archive19” and end with two characters, such as archive1988 or archive19xx. (Using the ? means any ONE character. Putting ?? means any TWO characters. In the example below, we stated “archive19??”
This would copy any folders that begin with archive19 and end with two characters. So it would copy archive1999, archive19AA . but It would not copy a folder named Data Archive or Archive Files
- Wildcard: In this scenario, we are specifying the condition to be any folder that begins with “Account”. Putting an asterisk means a wildcard. As long as the folder starts with Account and has something after it, it would be a match.
This scenario would copy folders that begin with Account and has something after it, such as Account Folders, Accounting, and account. It would not copy ABC Account.
- Wildcard beginning and end: If we wanted anything that contained a word (does not have to be in the beginning, then you could put an asterisk before and after the word such as contract
This scenario would copy folders that contain the word Account and has something before it or after it, such as Account Folders, Accounting, Account, and ABC account Files.
Example procedure based on path and wildcard
There is a scenario where you want to include only folders from a specific folder starting with a particular letter or string. A typical scenario that we often see is when an administrator wants to copy users home drives but wants to do it in batches. For instance, copy only home drives for users that begin with the letter ‘A’. Below is an example of this scenario
- Select the pattern\name\wildcard eclipse button.
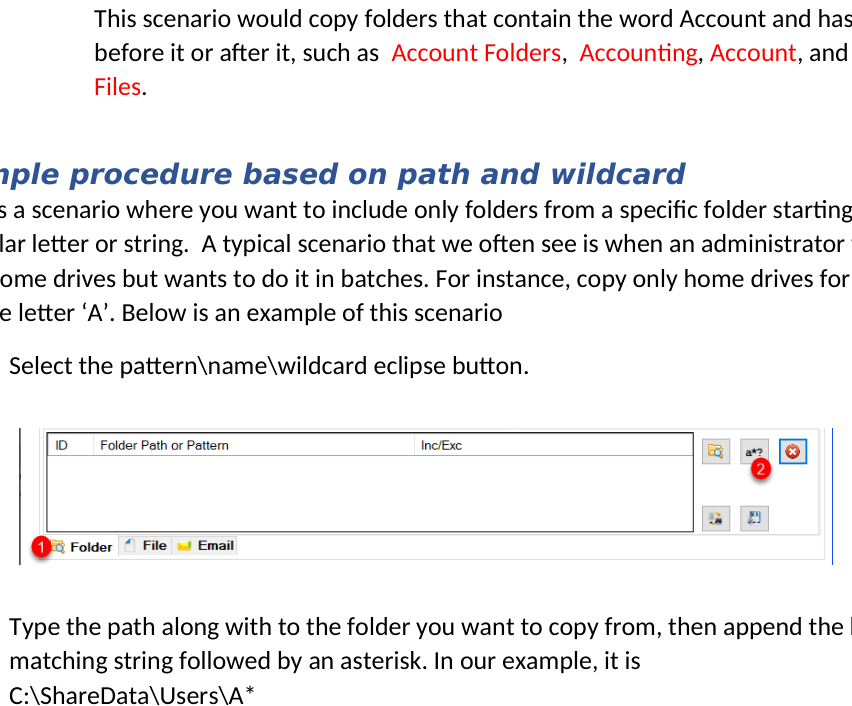
 2. Type the path along with to the folder you want to copy from, then append the letter or matching string followed by an asterisk. In our example, it is
C:\ShareData\Users\A*
2. Type the path along with to the folder you want to copy from, then append the letter or matching string followed by an asterisk. In our example, it is
C:\ShareData\Users\A*
- The folder filter should look similar to the figure below, once it is saved

If you save and run this job, the job would only copy folders from the Users folder beginning with the letter ‘A’ (it is not case sensitive in Windows shares). Below is a good example of the outcome, assuming we have a source with several users starting with different alphabets and what folders would get copied.
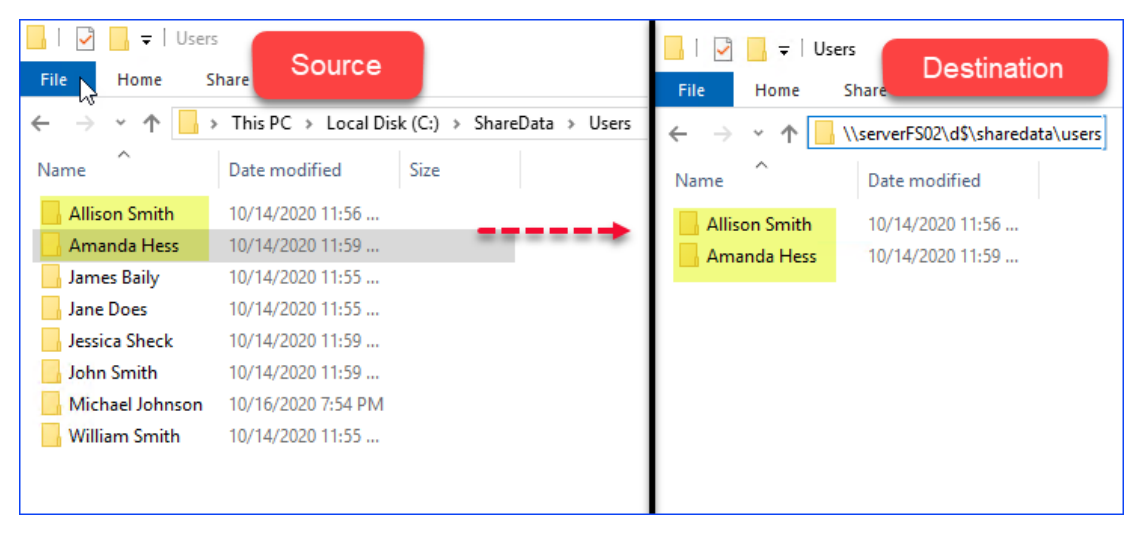
In the example above, only two folders were copied (Allison Smith and Amanda Hess) because they matched the criteria of starting with the letter ‘A’ and are in the same path c:\ShareData\users.
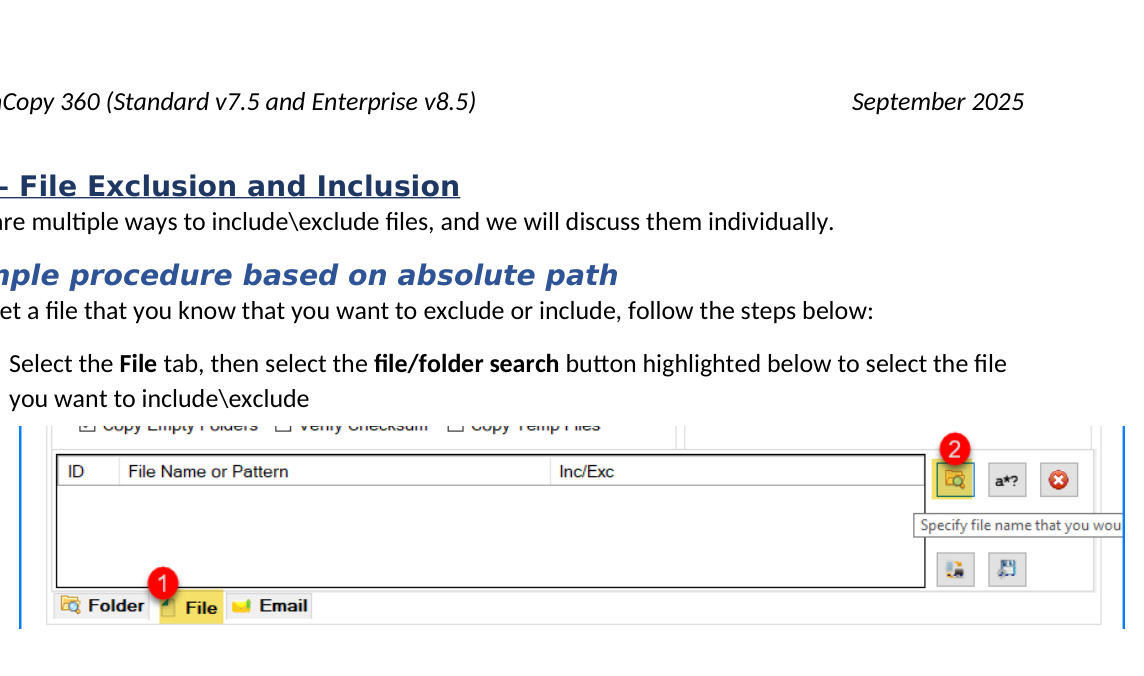
13B – File Exclusion and Inclusion
There are multiple ways to include\exclude files, and we will discuss them individually.
Example procedure based on absolute path
If you set a file that you know that you want to exclude or include, follow the steps below:
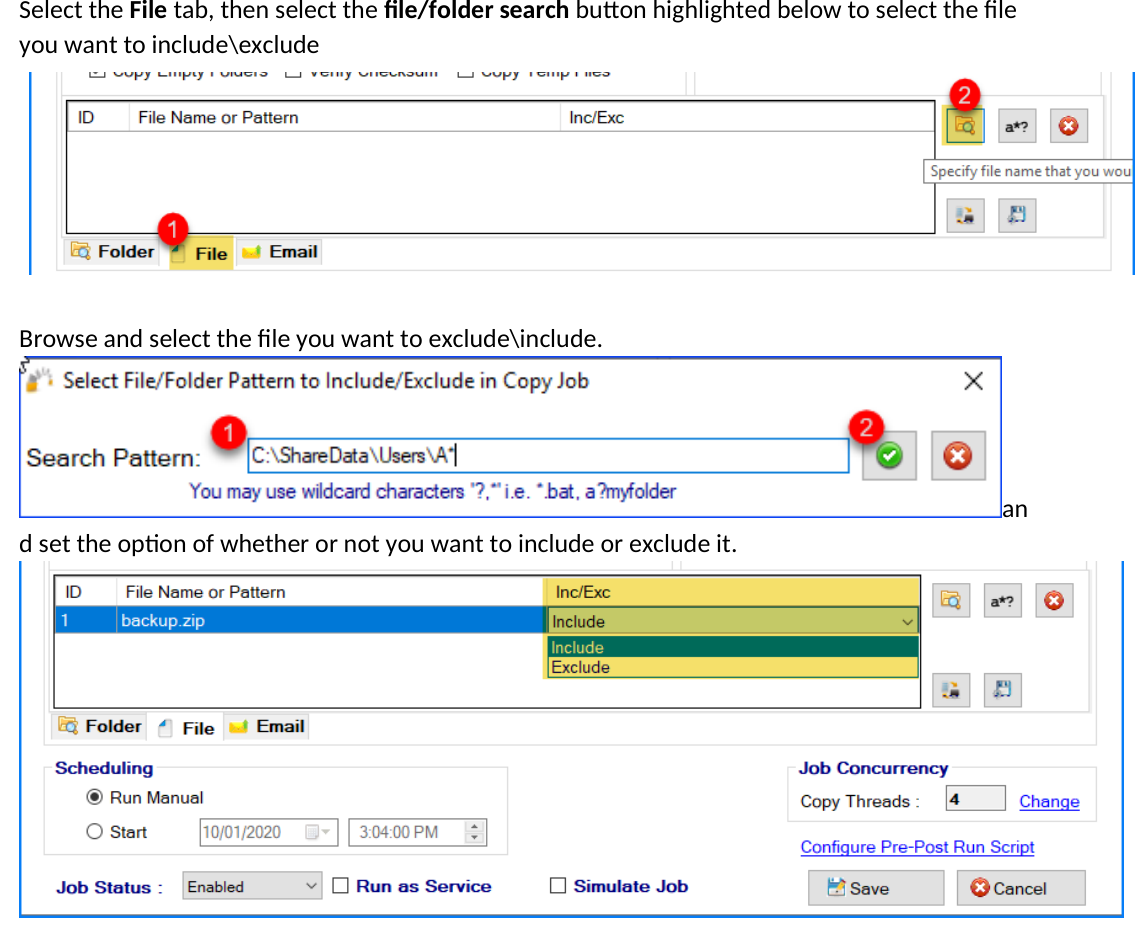
- Select the File tab, then select the file/folder search button highlighted below to select the file you want to include\exclude
- Browse and select the file you want to exclude\include. and set the option of whether or not you want to include or exclude it.

Example procedure based on wildcard, name, and pattern
If you want to include or exclude files based on a set criterion such as name or pattern, you can accomplish this by doing the following:
- Select the pattern\name\wildcard eclipse button.
 2. Type the name, pattern, or wildcard as per below. There are several scenarios:
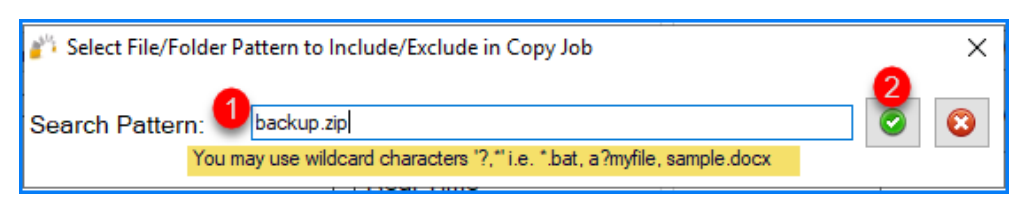
 1. Specify an Exact match: In the scenario below, we are stating that any files named “backup.zip” would match.

This would copy any files that have the exact name backup.zip. Would not copy the folder named My Backup.zip or Backup.zipx.
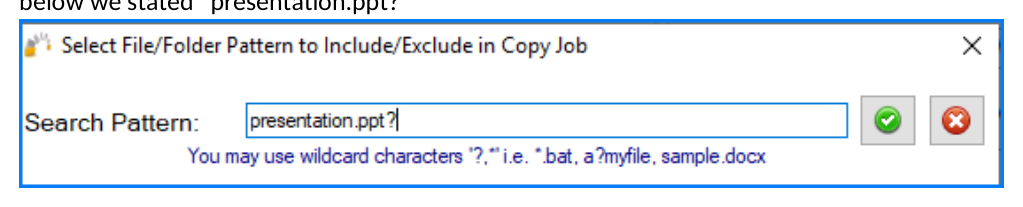
- Pattern: In this scenario, we specify the condition to start with “presentation.ppt” and end with one character such as presentation.pptx or presentation.pptz. (Using the ? means any ONE character. Putting ?? means any TWO characters. In the example below we stated “presentation.ppt?”
This would copy any files that begin with presentation.ppt and end with an extra character. So it would copy presentation.pptx, presentation.pptz. It would not copy a folder named presentation.ppt or My presentation.pptx
- Wildcard: In this scenario, we specify the condition to be any files that begin with “presentation.ppt.” Putting an asterisk means a wildcard. As long as the files start with presentation.ppt and could have something after it, it would be a match.
This scenario would copy files that begin with presentation.ppt and could have something after it, such as presentation.ppt, presentation.pptx, and presentation.pptx Final version. It would not copy My Presentation.pptx.
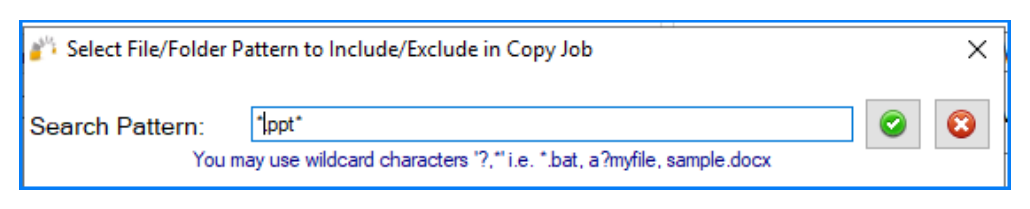
- Wildcard beginning and end: This is a common example of a requirement to copy all PowerPoint presentations. In this case, we would specify .ppt.
This scenario would copy all files that have the extension ppt and pptx, …etc. This would copy My presentation.ppt, My presentation.pptx, and Final Deck.ppt.
13C – Backup, Restore, and Delete Filters
 As you create the include and exclude filters, you may want to back them up to reuse for another job (or you can copy the job for simplicity) or to edit them. You can do so by using the export\import filters button, as displayed on the screen below. You can also delete a filter by selecting the filter you want to delete and click on the button.
You can export the backup of filters and modify them in a notepad-type application and restore them.
Note: The restore would overwrite the existing filters. Just follow the same pattern as the job filter and change the index number to a number that is not used. Then restore them using the restore feature. See the example below where we added the filters highlighted in Yellow.

Backup filter procedure
Follow the procedure below to backup any created file or folder filters associated with this job:
- Select the Backup Inclusion/Exclusion Settings button.
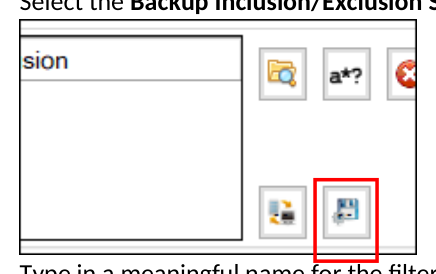
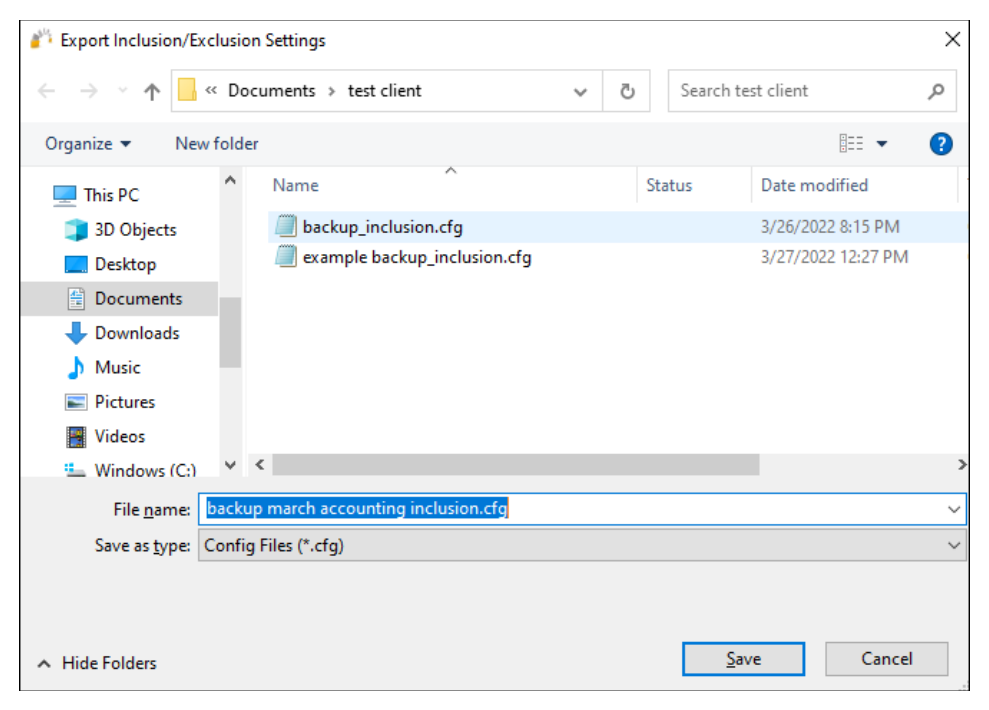
- Type in a meaningful name for the filter and select Save.
Restore filter procedure
Follow the procedure below to restore any created file or folder filters associated with this job.
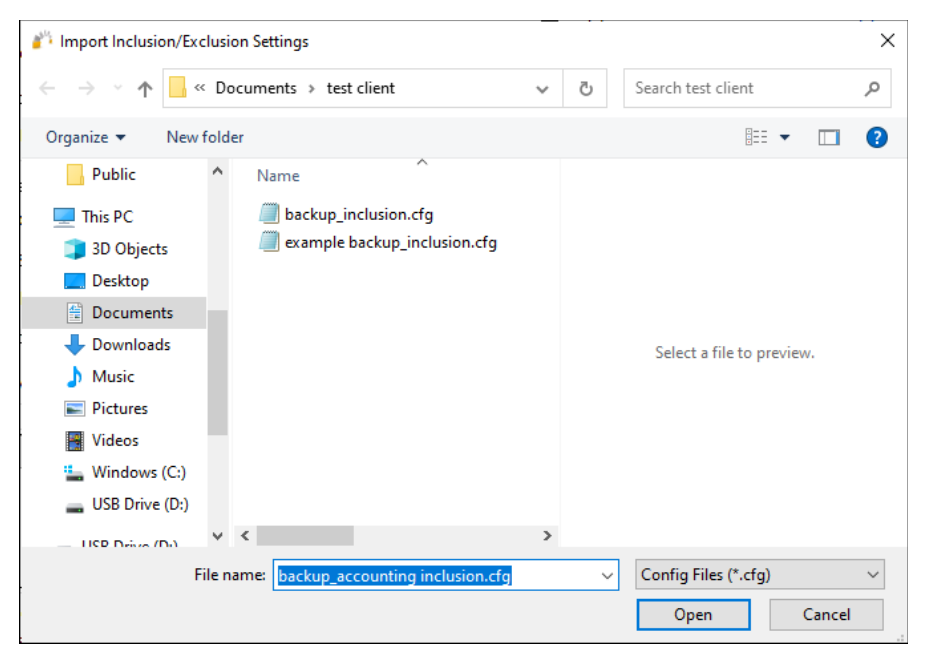
- Select the Restore Inclusion/Exclusion Settings button.
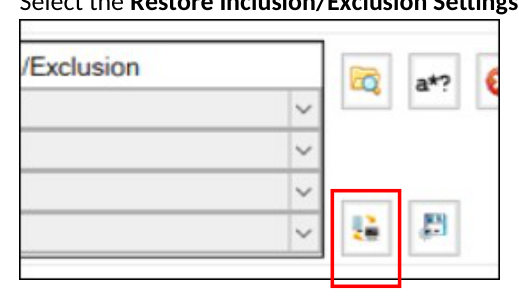
Browse over to the folder location when you previously saved your GS RichCopy 360 job filters.
- Select the filter that you want to apply to the current job.
14 – Email Tab
Allows you to overwrite the initial email recipients initially created in the Email Configuration Server selection in the Configuration section. For more information see Configuring Notification Email.
If you need to specify new email job recipients for a given job, follow the procedure below.
Procedure to Modify Email Recipients
-
Select a job from the main Jobs section. You can double-click on the job name. The Copy Job Configuration screen will display,
-
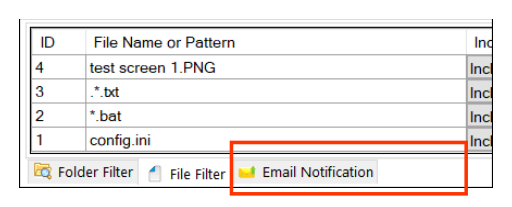
Select the Email Notification tab.
-
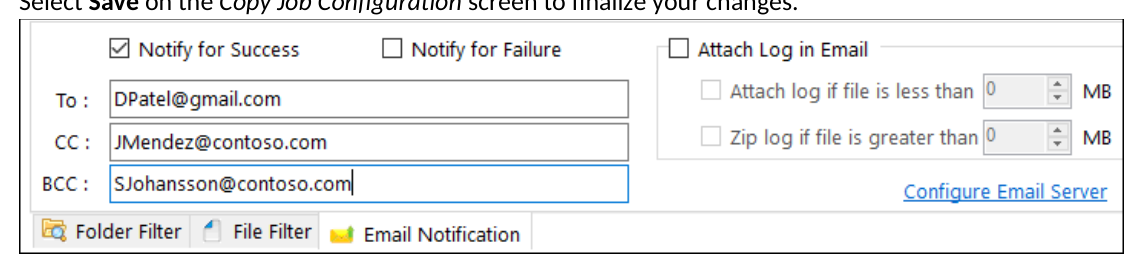
Enter an email address for any new recipient in the available section (To, CC, and/or BCC).
-
If you want to view or change the default email server settings, you can select the Configure Email Server link shown in this area of the screen.
-
Select Save on the Copy Job Configuration screen to finalize your changes.
15 – Scheduling
Jobs can be run manually or scheduled in advance to run at a later time. This becomes useful when coupled with the option to run as a service as jobs can then run without any user intervention. It uses the set it and forget it approach. You may select the following options:
-
Run Manual—indicates that this job can only be started manually by the user.
-
Start (at a set date and time)—indicates that the job is a one-time event or runs according to a set schedule. The scheduling options vary from daily, day of the week, monthly, yearly, and so forth.
Jobs can be set to run according to the following options:
-
Run Once—runs the job only once.
-
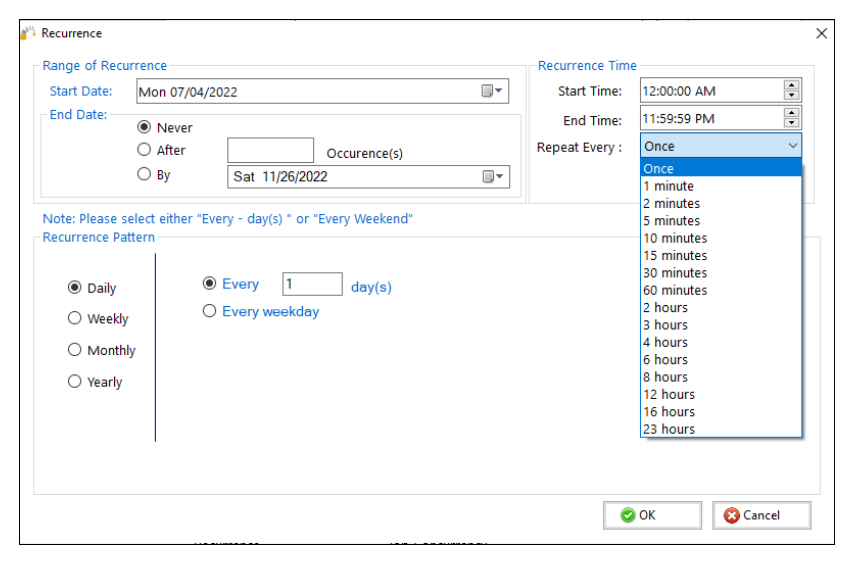
Repeat—sets the job to run more than once according to a recurring schedule. When you want to run a job on a repeating schedule, select the Set Schedule link to open the Recurrence screen. In the Recurrence Time section of the window, there are two important things to note about Start Time and End Time:
-
If a job takes longer to complete and overlaps the next interval, the job will continue to run, and the scheduler will schedule the next interval when the job completes given that the job completes before the End Time.
-
End jobs are allowed to start before the End Time is reached. Jobs will not be stopped if they are already running, and the End Time is reached.

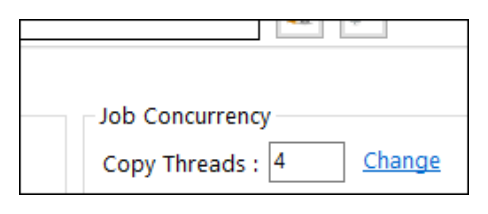
16 – Job concurrency
By default, GS RichCopy 360 uses 4 simultaneous copy threads, which means 4 files can be copied at the same time.
System administrators can change the number of threads. This should be changed based on the following recommendations
-
The number of threads should be no more than double the available logical cores on the system. (Ideally, the same as the logical cores but up to fewer than double the number of cores).
-
The more threads used; the more resources are consumed on the system. If this job is running on a production machine, reducing the thread count may be best to lower resource and memory consumption.
-
While a system may have a lot of computing resources (CPU and RAM), storage and network also must be taken into consideration. To avoid OS or network congestion or a bottleneck, it is wise to have a lower number of threads. This can happen when on a system with a basic storage subsystem or if the destination is across a WAN connection that is highly congested. GS RichCopy 360 is a true multi-threaded system. Each thread runs on a dedicated core for as long as the number of threads equals the number of logical cores.
Note: This option has more important technical details.
The Task Manager is a good way to find out the number of available logical cores.
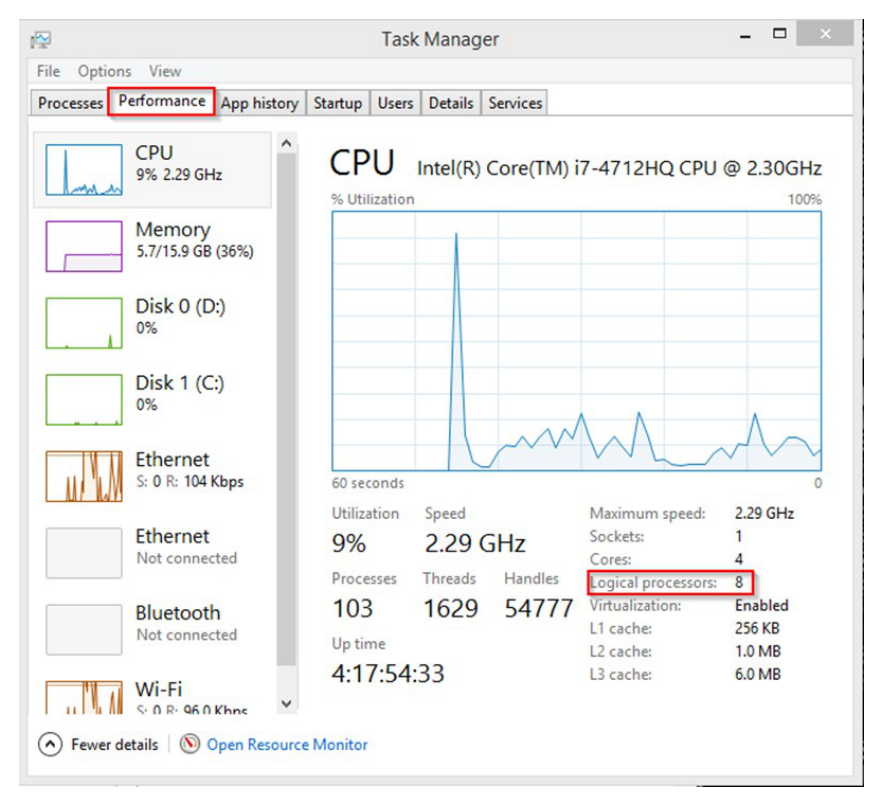
Note: Increasing the number of logical cores to more than double what the system has available can cause CPU contention and can reduce performance. Furthermore, increasing the number of threads by double does not mean the job time is cut in half.
17 – Run as Service
If the Run as Service checkbox is selected, the job will run as a service using the service credential specified in the main Configuration section (default is Local System Account). If the option is not selected, GS RichCopy 360 will utilize the session of the logged-on user running the application.
The following are the advantages to running a job under a service account:
-
The jobs will not terminate due to a user logging off or closing the GS RichCopy application.
-
A service account can run as the Local System Account, which is an account that has full access to every file and folder on the system (in most scenarios). For example, a machine that has locked down permissions may have issues copying folders and files as the user credentials used may not have sufficient access rights.
-
Using a service account running as a Local System Account may provide better results. It is worth noting that jobs must be set to run at a scheduled time to be configured to run using a service account. A scheduled job can always be triggered to start manually which is in fact running the job as a service.
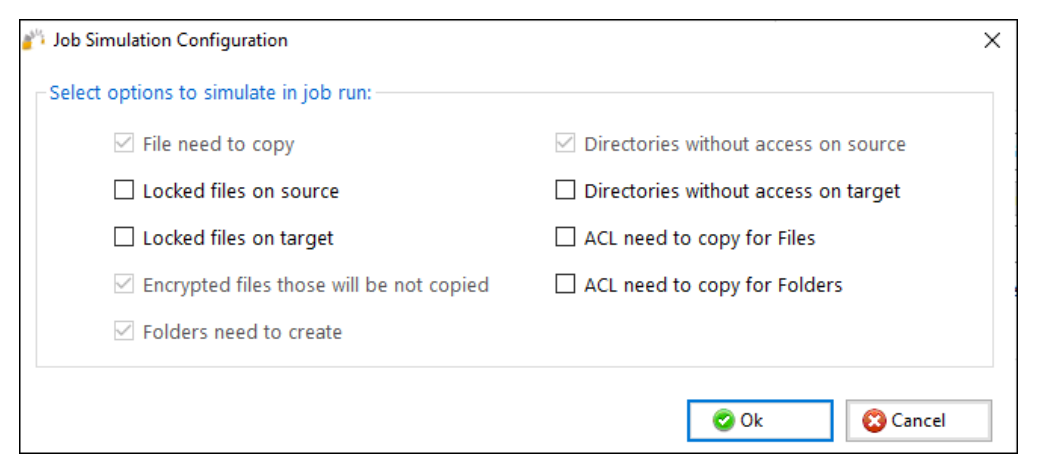
18 – Simulate Job
This option allows administrators to understand what exactly happens when the job starts through detailed logs without a real copy. This option has the configuration shown in the following image. There are four options greyed out and five that can be chosen.
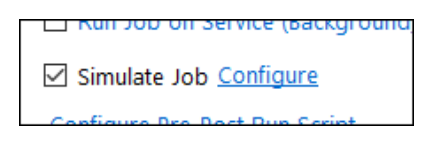
After you select the Simulate Job checkbox, the Configure link will be shown, from which you can select additional job configuration options.
Be aware that the grayed-out selections are already preselected and cannot be unselected.
19 – Configure Pre-Post Run Script
Selecting this option displays the Pre-Post Job Run Script Configuration window. The options displayed in this window run as a service.
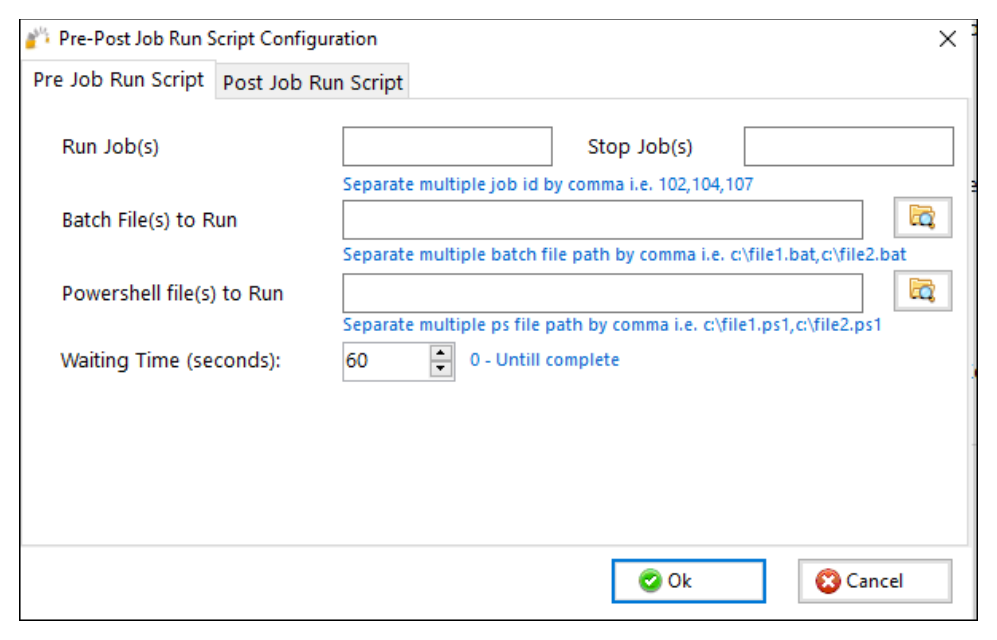
Pre-Job Run Scripts
-
Run Job(s)—option to set up the job(s) ID to run.
-
Stop Job(s)—option to set up the job(s) ID to stop.
-
Batch File(s) to Run)—option to select one or more batch files needed to run before the selected job(s).
-
PowerShell Files(s) to Run option to select one or more PowerShell files needed to run before the selected job(s).
-
Waiting Time (Seconds)—instructs the job to wait for X seconds before it runs after the pre-tasks are triggered.
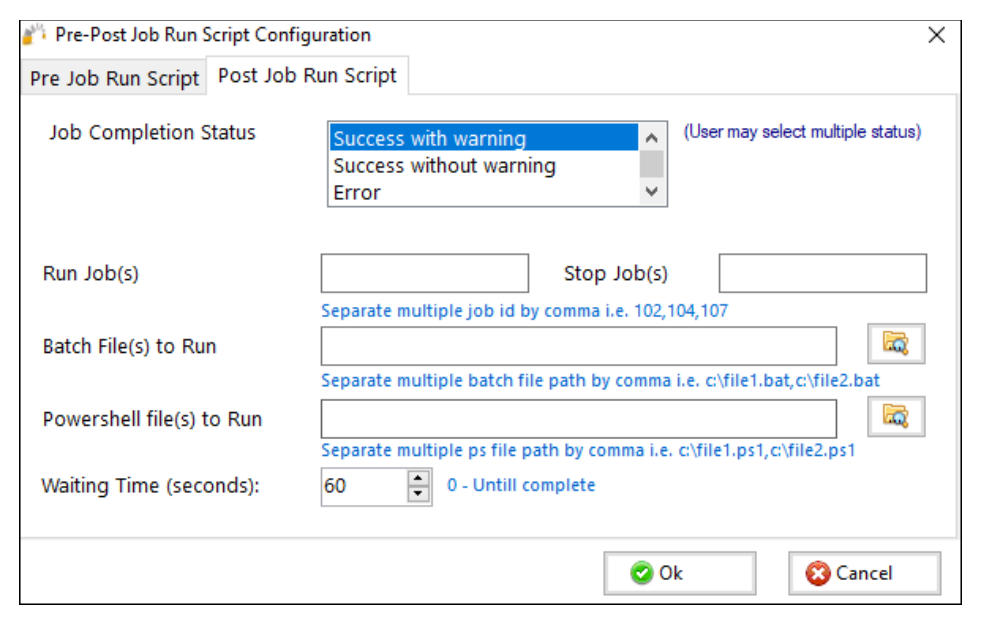
Post Job Run Scripts
-
Job Completion Status—illustrates the job’s behavior. The user has the option to set up the conditions under which the post job runs will run. The user can select multiple conditions. If the selected condition matches the job’s end result, the post conditions are triggered.
-
Successful with warning—shows that the job completed and shows the warning if it exists.
-
Success without warning—shows that the job completed and does not show the warning even if it exists.
-
Error—shows that there has been an error.
-
Abort—shows that the job aborted for some reason.
-
Run Job(s)—option to set up the job(s) ID to run.
-
Stop Job(s)—option to set up the job(s) ID to stop.
-
Batch File(s) to Run— option to select one or more batch files needed to run after the selected job(s).
-
PowerShell Files(s) to Run— option to select one or more PowerShell files needed to run after the selected job(s).
-
Waiting Time (seconds)—instructs the job to wait for X seconds after it triggers the pre-tasks.
20 - Job Status
Jobs are created as Enabled by default. This means they can be run on demand or as scheduled jobs. Jobs that are set to disabled will NOT run on demand or as scheduled.
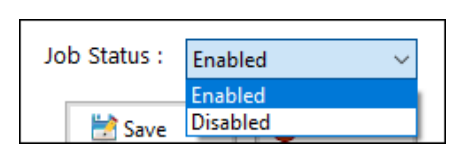
 If a job is duplicated or copied, the duplicated job will be set to Disabled by default.
Disabled copy job
Creating a job with the schedule wizard
GS RichCopy 360 offers a simple job schedule wizard. The wizard walks administrators through the most used settings with a full summary of the selected options displayed at the end for confirmation.
While most of the available options are self-explanatory, help tool tips are displayed next to each setting to further clarify its role, purpose, and how it impacts the job if selected. Tool tips are represented by the question mark icon .
Also, expert users have the option to skip the wizard and jump directly to the detailed job screen and create the job that way.
Note: Once a job is created (whether through the wizard or the detailed job’s screen), it can always be modified later if the need arises.
To create a job using the Job Schedule Wizard, follow these steps:
- In the GS RichCopy 360 window, select the Jobs section, and then select the New Job button to launch the Schedule Wizard.
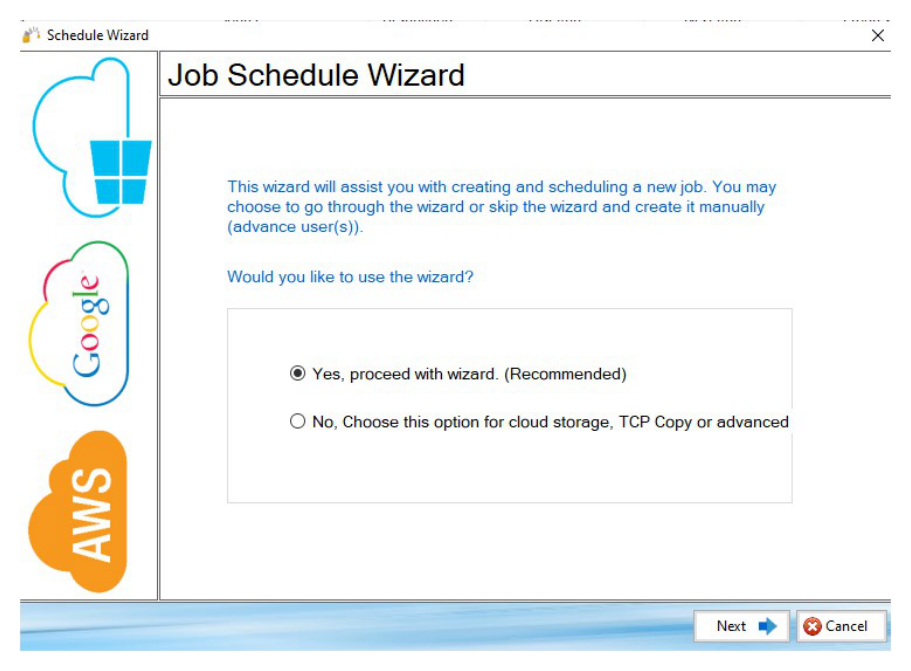 2. Allow the Yes, proceed with wizard option.
- Select Next.
Proceed using the job Schedule Wizard, advanced users have the option to skip the wizard.
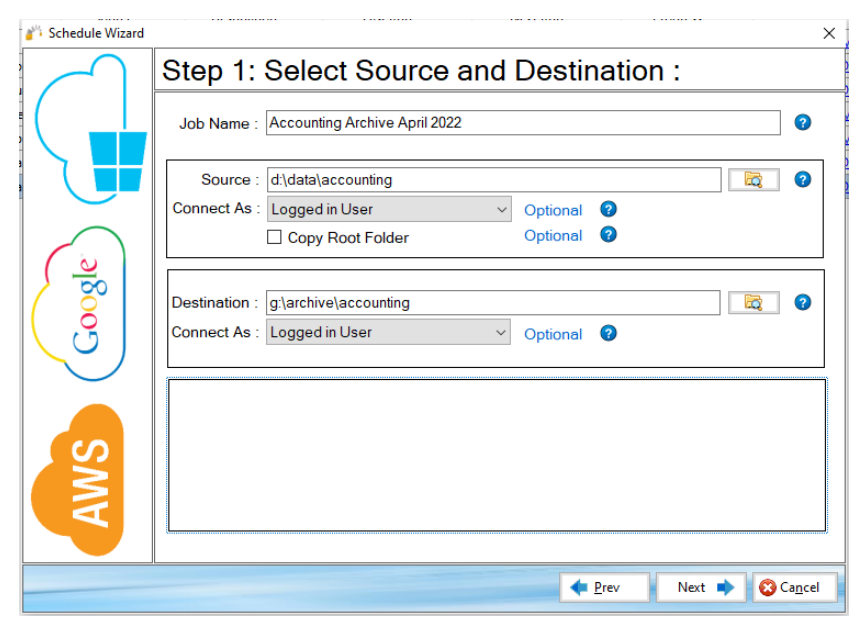
- Enter a unique Job Name.
-
Select Next.
-
Specify Source and Destination settings.

-
Select Next.
-
Select one option from the Copy Options section.

- Configure the Copy Features section.

-
Select Next.
-
Configure the Logging, Alerting, and Scheduling settings.
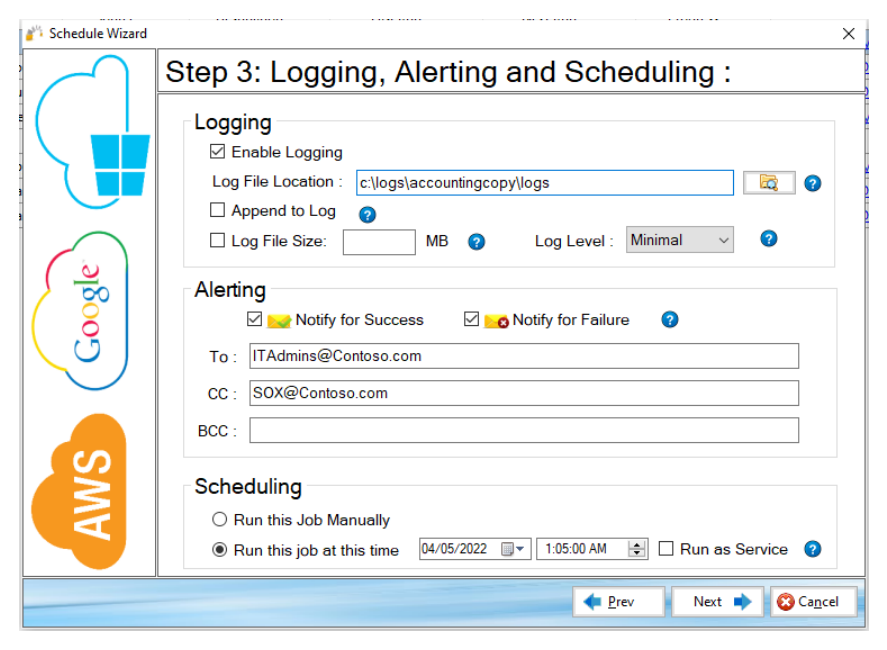
- Select Next.
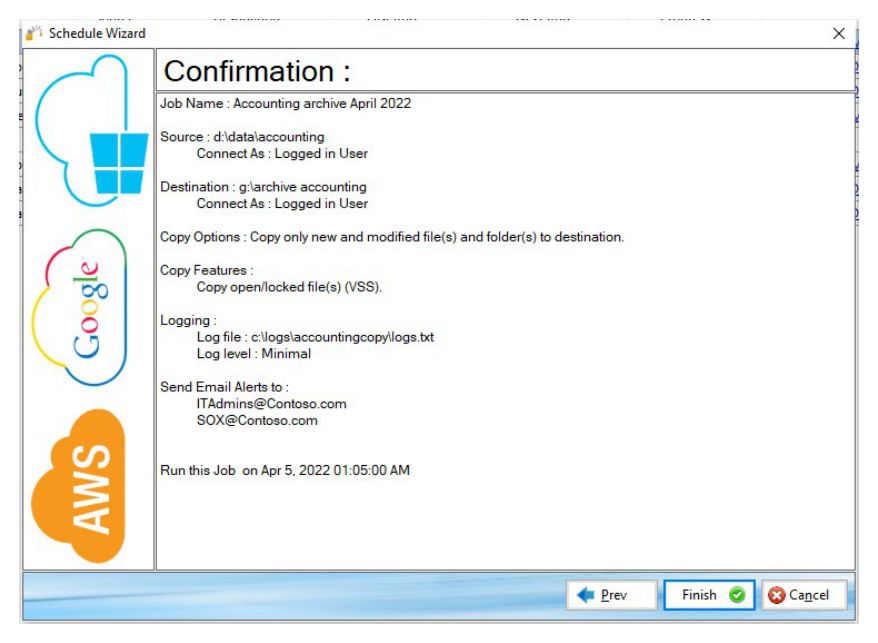
- Review the job details in the Confirmation screen and select Finish. Use the Prev button to return to a previous screen if you need to make any changes.
The newly created job will be placed in the Jobs section of the main menu.
Example Section B – Creating a TCP Copy Job (Enterprise).
When the destination is a cloud location, you will need to provide the appropriate account information in the Connect As section. For additional information refer to Example Section E - Copying to the Cloud.
Note: The Path variable is supported in this field. For more information, refer to Example Section K – Environment Variables.
History section
The History section is accessed from the main menu of the GS RichCopy 360 application. It contains a listing of all previously ran jobs. There is also an option to purge, or delete, all jobs from the history section.
For more information see Example Section H - History Section

History section reference
The History section displays a listing of all jobs that are running or have already run.
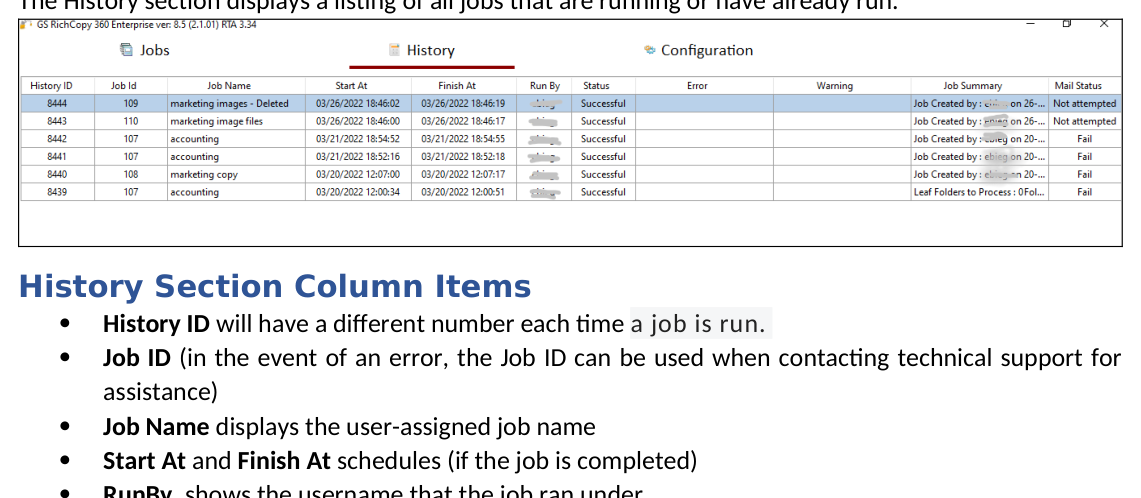
History Section Column Items
-
History ID will have a different number each time a job is run.
-
Job ID (in the event of an error, the Job ID can be used when contacting technical support for assistance)
-
Job Name displays the user-assigned job name
-
Start At and Finish At schedules (if the job is completed)
-
RunBy, shows the username that the job ran under
-
Status (In Progress, Successful, Stopped, or Failed)
-
Error and Warning if the job encountered them
-
Job Summary, hovering over this field will display the content of that job’s log.
-
Mail Status lists email delivery status within the GS RichCopy 360 application environment. Status options can be "successful", "failed", or "not attempted". If the email was "not attempted", it means that this functionality was not configured for the specific job. As a result, an email delivery was never attempted.
Note: Placing the mouse on a field will display the full text contained in the field.
Right-click Menu Functionality
Right-clicking anywhere in the History section will display a right-click menu with additional functionality: Export History, Refresh, and Purge All.
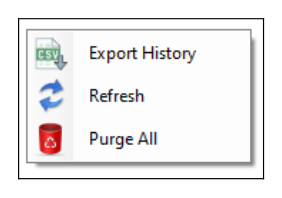
Export History – exports table items to a .csv file and may automatically launch a spreadsheet.
Refresh – Updates all items in the History table to the latest information.
Purge All – Deletes all jobs in the History section. It is recommended that you export the job history prior to performing this procedure. Since this procedure is not reversible, an alert window will display asking you to confirm the operation.
