Cloud copy
Copying to the Cloud
GS RichCopy 360 Standard offer the option to copy to several different cloud providers. However, GS RichCopy 360 Enterprise can copy from and to a wider selection of cloud providers. Please note that we are continuously adding other cloud providers.
Cloud providers currently supported are:
Microsoft Cloud
OneDrive/SharePoint Online
-
User Authentication
-
App Authentication
Azure File Share (Available in Enterprise Only)
Azure Blob Storage
Dropbox Cloud
Amazon S3 Cloud
Box.com – Cloud (Available in Enterprise Only)
S3 Compatible Storage - Cloud (Available in Enterprise Only)
Google Drive Cloud (Available in Enterprise Only)
Note: It is important to note that some of the cloud providers could use significant bandwidth which could slow down other services and users. GS RichCopy 360 offers a throttling feature to limit the bandwidth consumption when copying to any of the cloud providers. Please refer to Cloud Bandwidth Throttling.
Microsoft Cloud
Whether you are copying to OneDrive Personal, OneDrive Business, or SharePoint Online, they all have the same requirements and follow the same process. As a result, they are all covered in one section.
Note that Azure Blob Storage uses a different process and is described in its own section.
OneDrive / SharePoint Online
 There are two ways to connect to OneDrive and SharePoint Online. You must understand the difference and the impact on throughput for each method we will discuss in further detail.
Microsoft Office 365 made it possible to copy data to its resources (OneDrive Personal, Business, and SharePoint Online) using one of two different methods:
- User Authentication: User authentication is a step that requires the user to enter a username and password. This process is straight forward but intended for smaller sized copy jobs as Microsoft Office 365 throttles traffic using user-based authentication, especially if they are experiencing a massive workload at the time of copying. Therefore, it is recommended to copy more extensive data during the weekend and after hours. However, Larger data migration jobs should use App Authentication as Microsoft Office 365 treats jobs using App Authorization as background migration jobs with a much higher threshold in terms of throttling limits. With that said, Microsoft Office 365 still recommends that larger jobs to be processed after business hours and on weekends where possible as the threshold could be lowered at times when Office 365 resources are under workload stress.
To configure a job using User Mode Authentication:
-
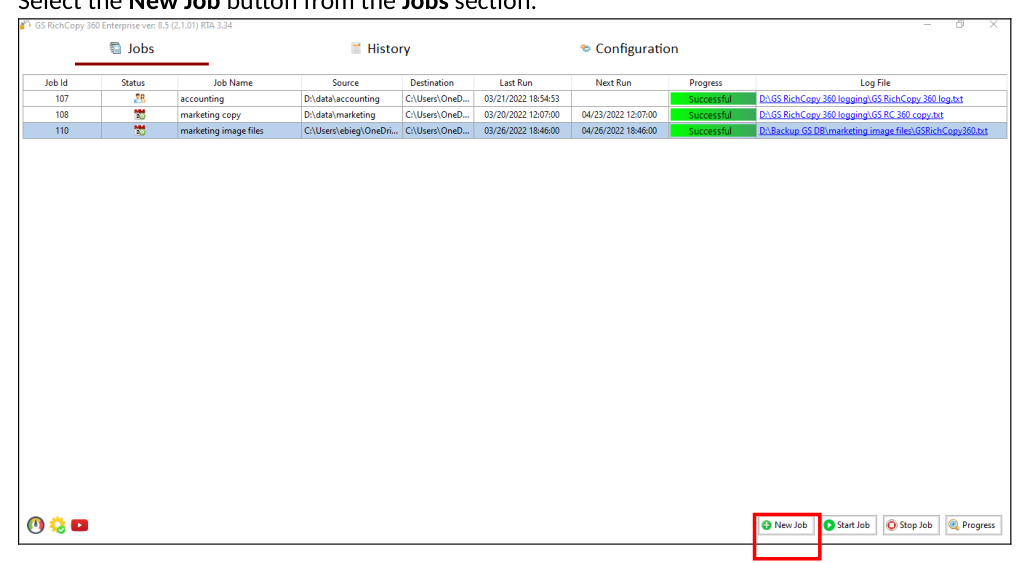
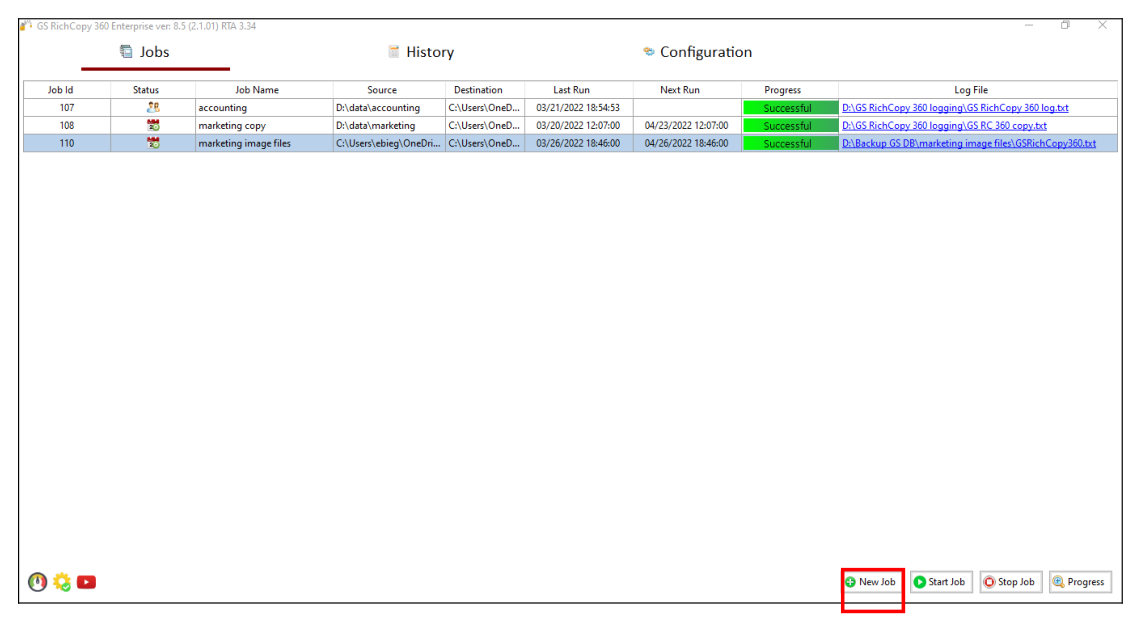
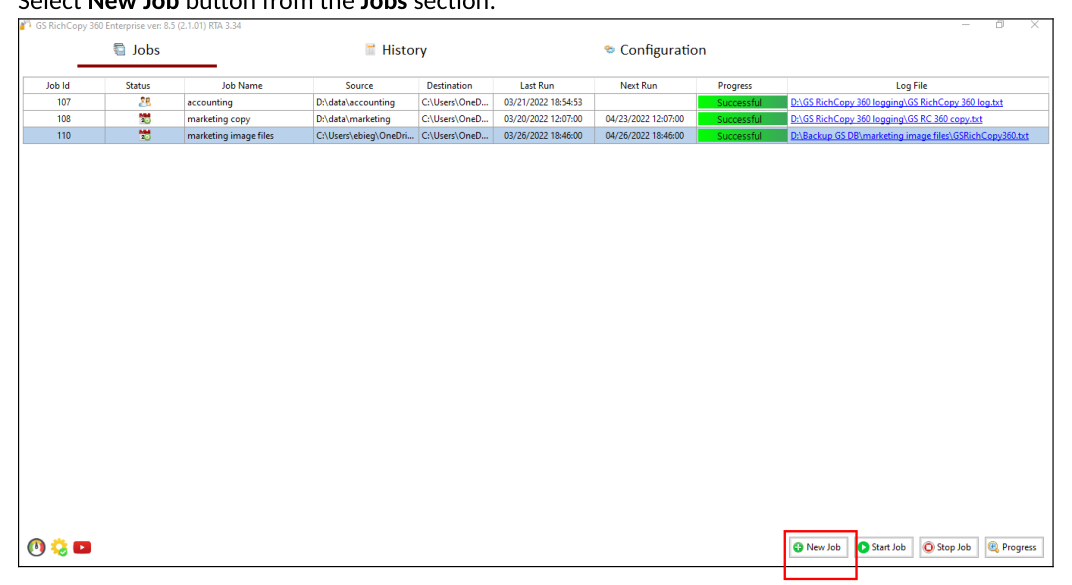
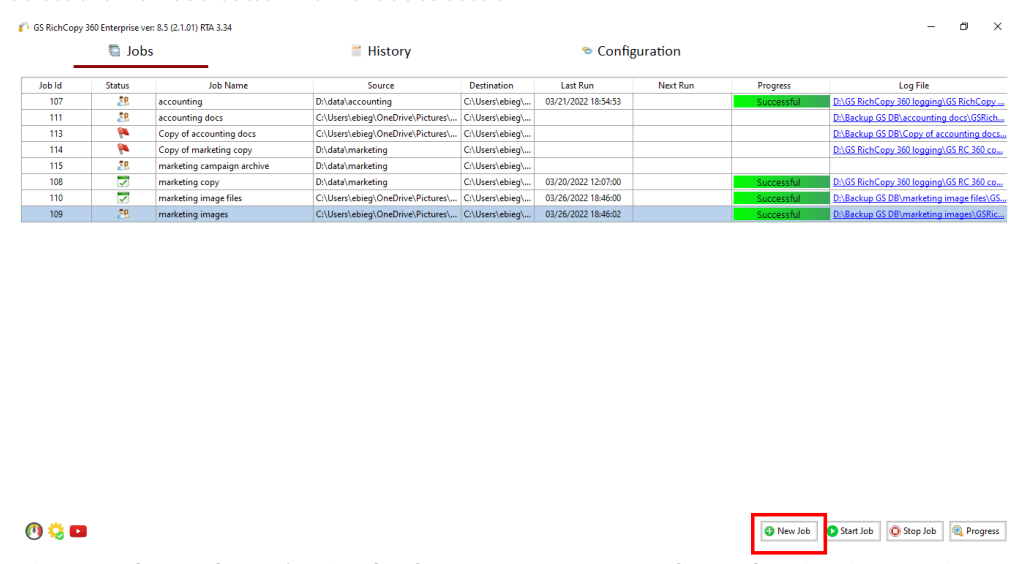
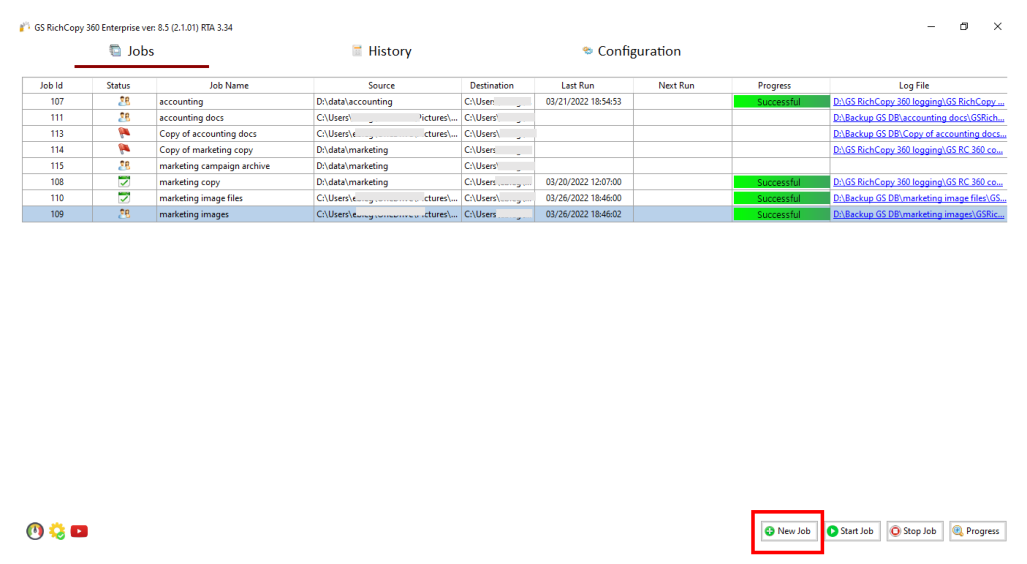
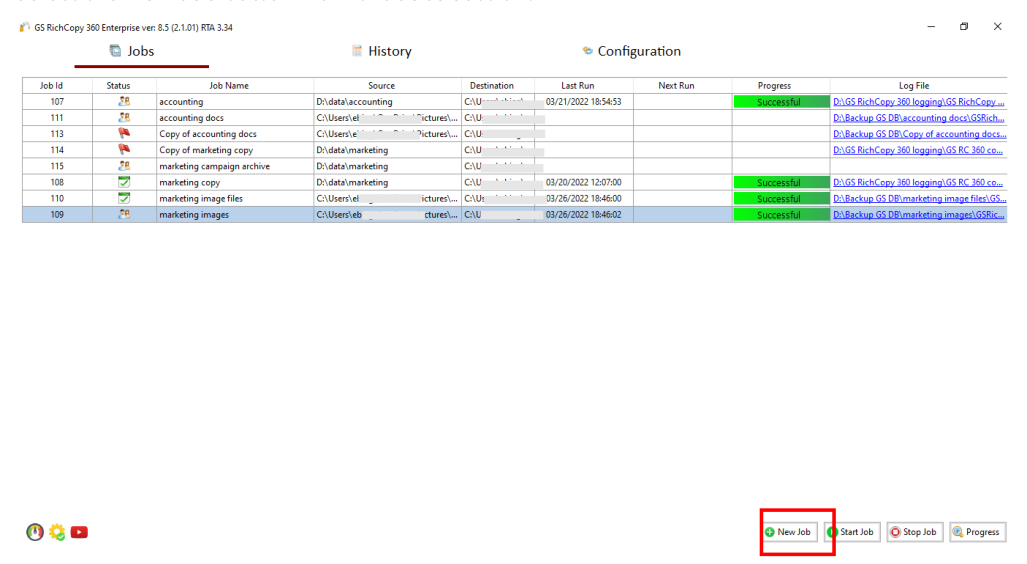
Select the New Job button from the Jobs section.
-
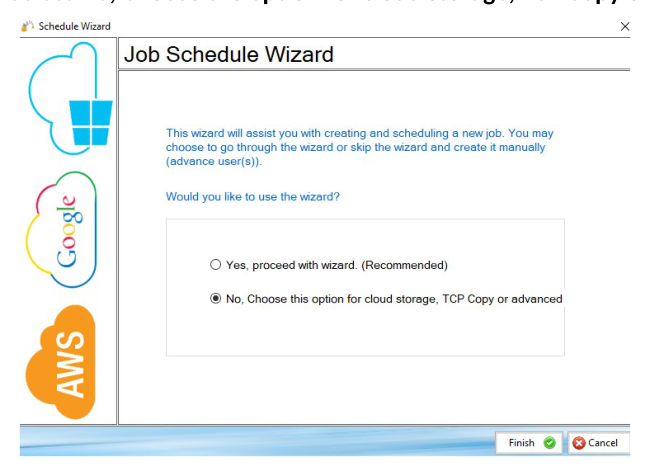
Select No, Choose the option for cloud storage, TCP Copy or advanced.

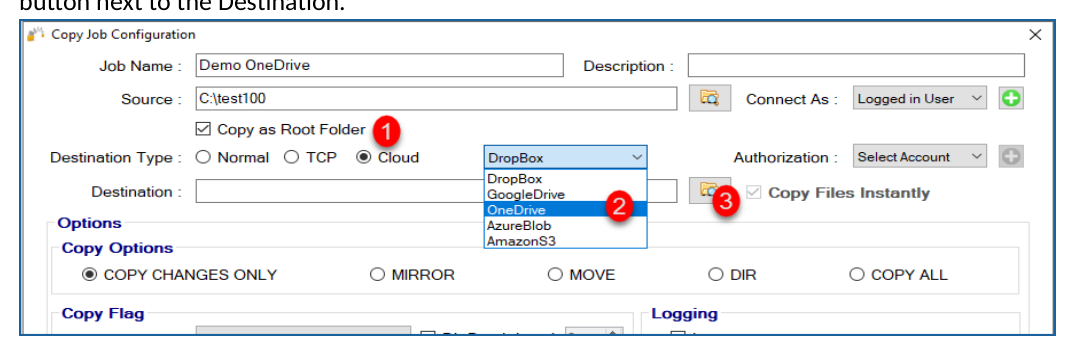
- Fill out the required fields (job name, source) and then select Cloud and choose OneDrive (this covers OneDrive Personal, OneDrive Business, and SharePoint Online). Then click on the browse button next to the Destination.
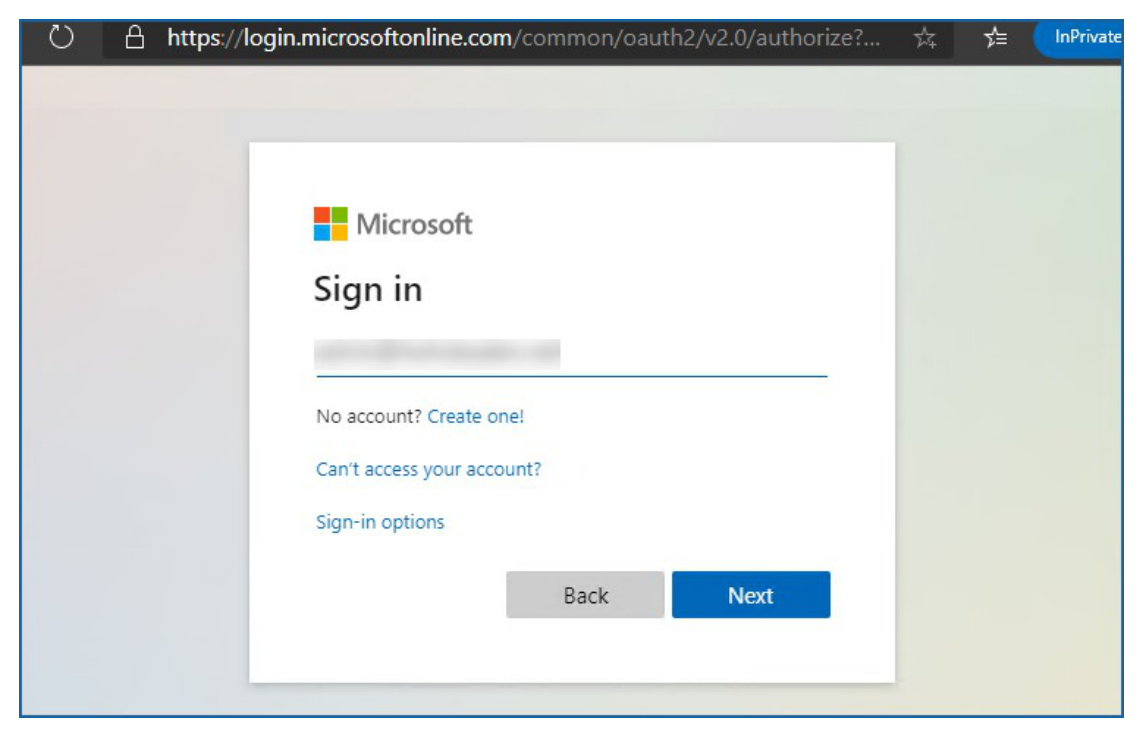
- The default browser should open and prompt for a username (email format) and password. Provide the credentials and click Next (if it prompts you to stay signed in, you can choose yes or no; it does not impact our process).
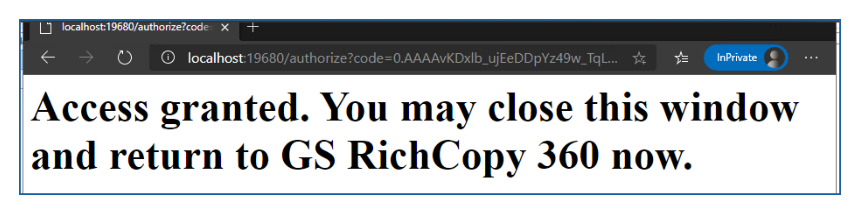
- After completing the authentication steps, the browser should notify you that GS RichCopy 360 access has been granted and that it is safe to close that window. You can close that window now and go back to the application.
- You should see a list of folders; you can expand the folders to drill down. Select the folder where you want to place your data and click OK. Note: Depending on your access, you may see a list of many folders.
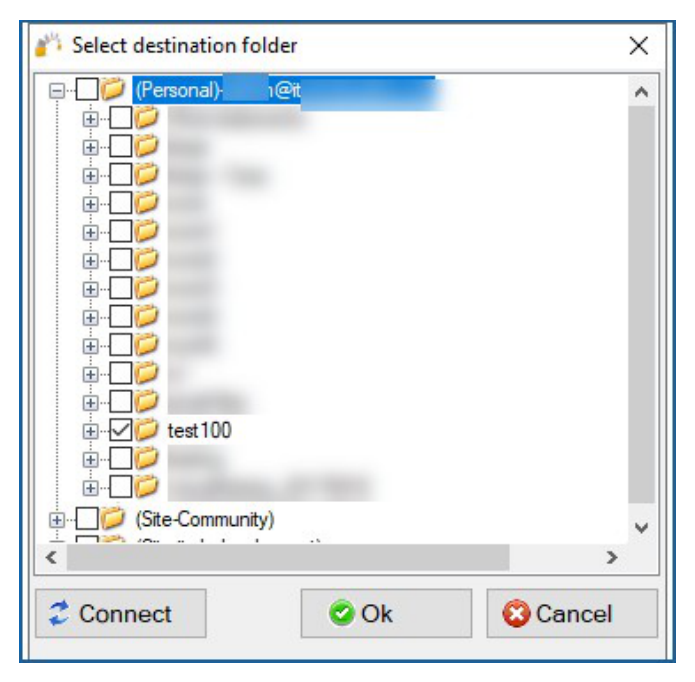
- The destination field should be automatically populated, reflecting the path selected.
 8. You can now create the rest of the job by choosing the copy options you want as you would in a normal job.
Note: The credentials are stored in an encrypted format, resulting in jobs that can run uninterrupted, in addition to running as a service. You do not need to provide credentials for this job again unless the job is idle for over 8 to 12 months.
- App Authentication: As indicated earlier in the previous section, App Authentication is highly recommended and used in large migrations as Microsoft Office 365 does not throttle it as much as it throttles User Authentication.
To use App Authorization, the user credentials used must have a Global Admin Role. Follow the steps below to configure a job:
To configure a job using User Mode Authentication:
-
Select the New Job button from the Jobs section
-
Select No, Choose the option for cloud storage, TCP Copy or advanced to skip the wizard.

- Fill out the required fields (job name, source) and then select Cloud and choose OneDrive (this covers OneDrive Personal, OneDrive Business, and SharePoint Online).
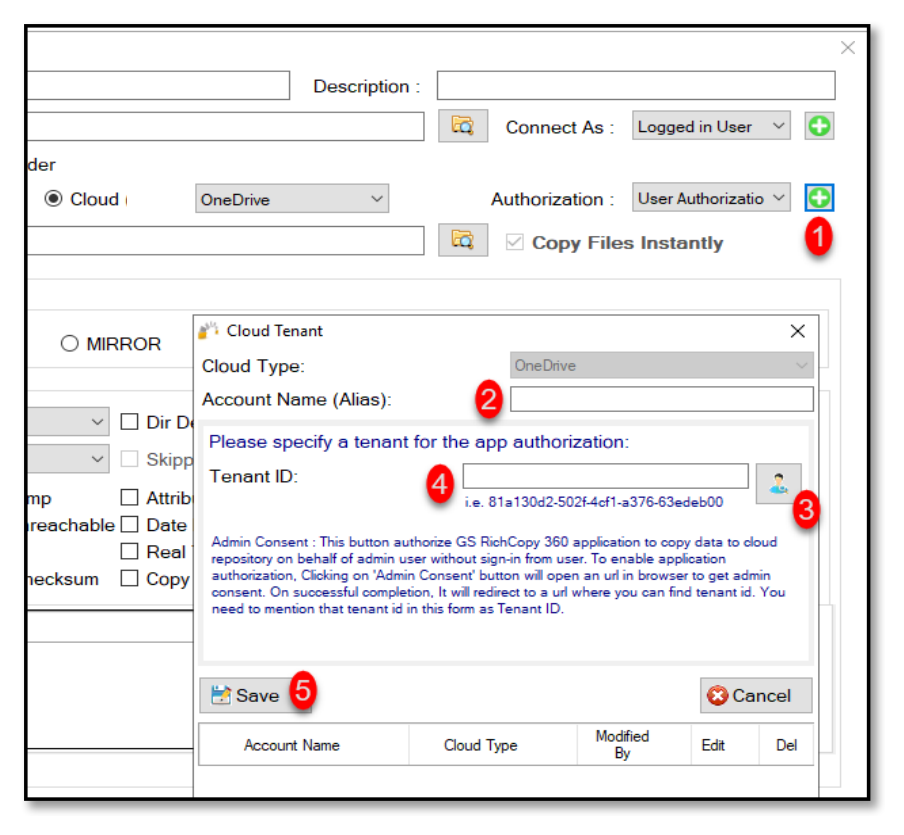
Then click on the Plus sign button next to Authorization . Once clicked, a new window will pop-up prompting for a few fields as per the screen below:
-
Account Name: This is just an Alias\ label.
-
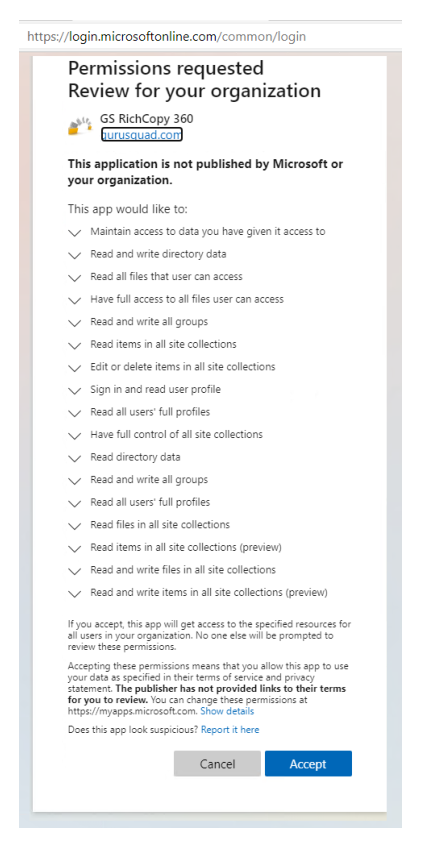
Clicking on this button initiates the authorization request to allow the application to access OneDrive\SharePoint resources. A web browser will pop out prompting for username and password (global admin role is required). Once logged in, it will request permission to grant GS RichCopy 360 the access required.
-
Once the access has been granted, a confirmation screen will be displayed.
-
Click on Save .
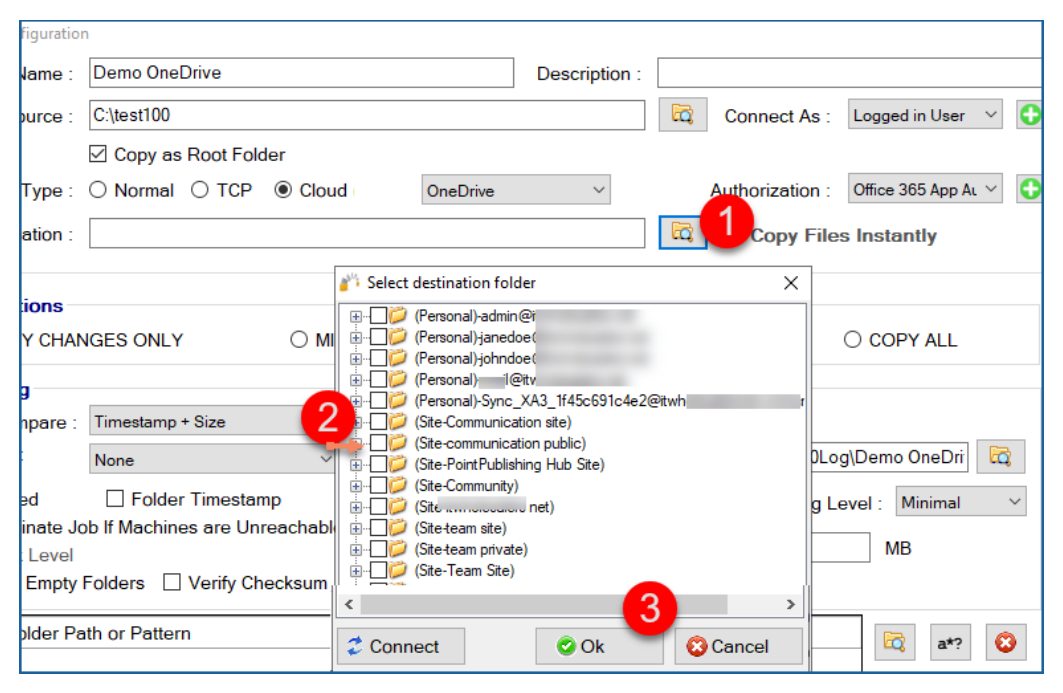
- Now that access has been granted, click on the browse button next to the destination, and it should enumerate all the available folders to which you have access. Select the folder you want to copy the data to and click on OK.
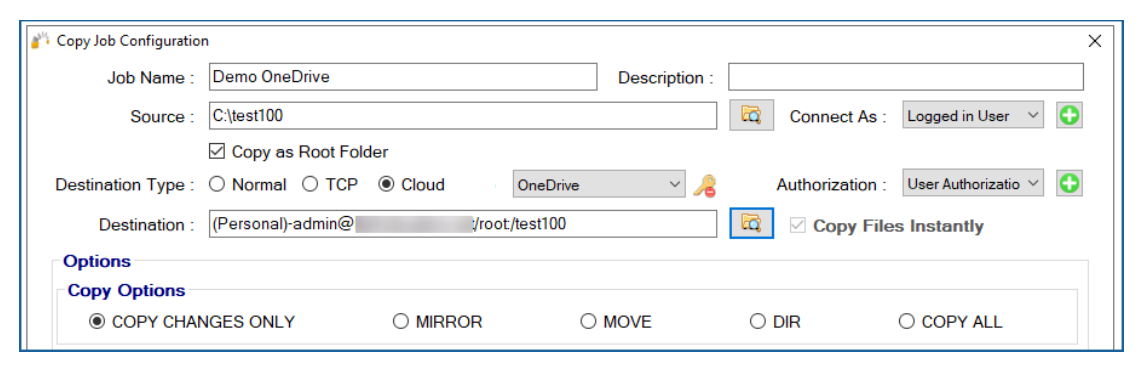
- Once you have selected your destination folder and click on Ok, you should see the path populated in the destination field as below:
- You can now create the rest of the job by choosing the copy options you want as you would in a normal job.
Note: The credentials are stored in an encrypted format. This means that jobs could run uninterrupted as well as run as a service. You do not have to provide credentials for this job again unless the job is idle for 8 to 12 months.
Azure File Share - Cloud
Connecting to Azure File Share can be done by either the Storage Account Key or Active Directory (assuming the Azure File Share is joined to an Active Directory Domain.) The example below shows how to connect using a Storage Account Key.
Follow these simple steps to copy to Azure File Share (for enterprise clients, you could do the same steps to copy from Azure File Share).
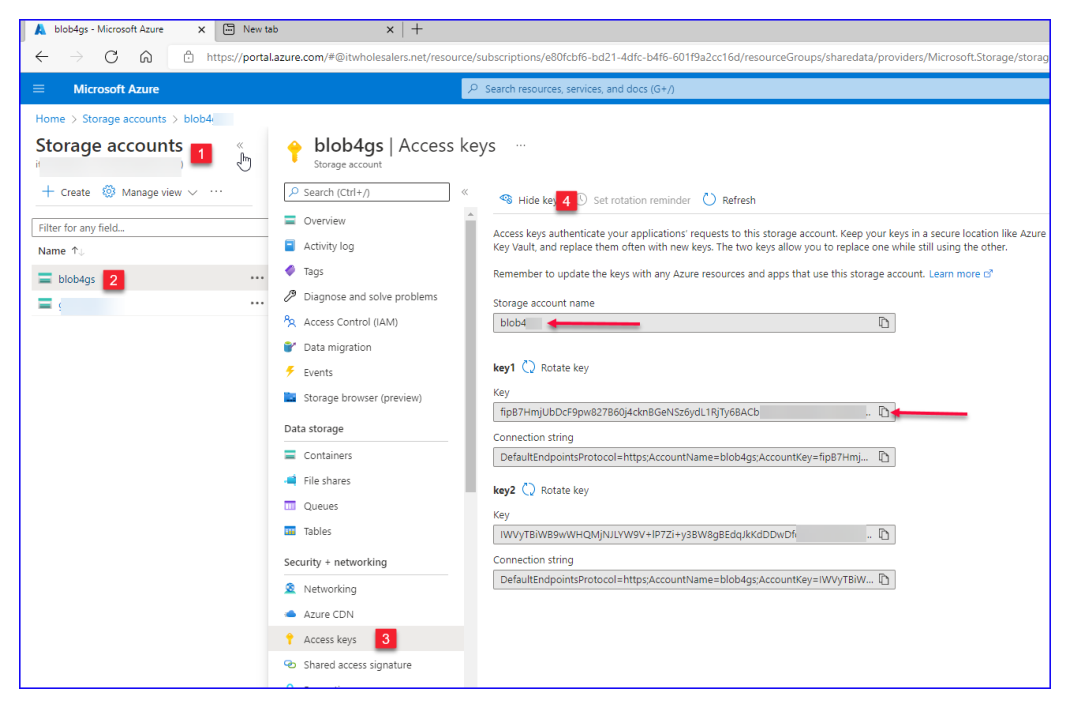
- First, ensure the Azure File Share is created on the Azure Portal and get the Storage Account Name and Key (key1 or key2 can be used).
-
Once logged into the Azure Portal, click on storage accounts (Step 1)
-
Click on the Storage Account that we are copying to (Step 2)
-
Click on Access Keys (Step 3)
-
Copy the Storage Account Name and Key1 (to a temporary location as they will be needed later during the job configuration process in GS RichCopy 360).
-
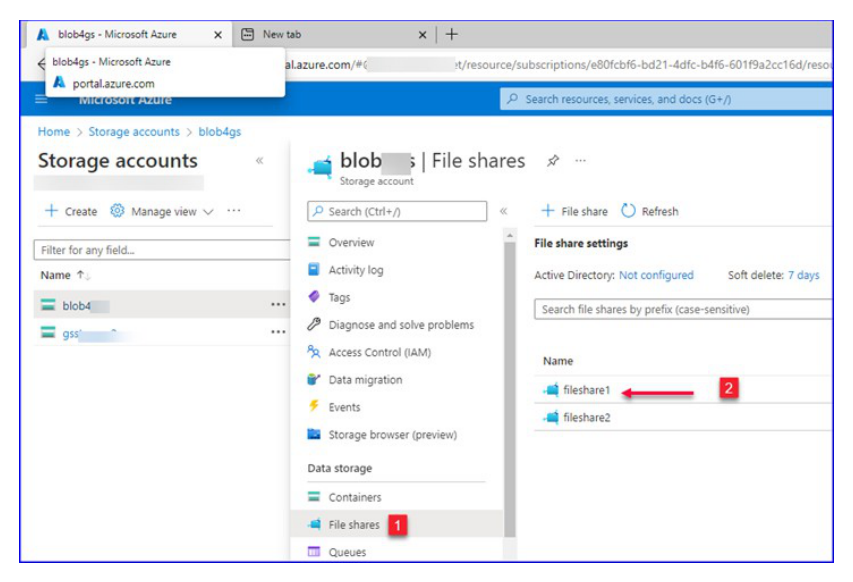
Create an Azure File Share if it is not already created and select it.
-
Click on Files Shares (Step 1)
-
Click on the file share which will be used as the destination (Step 2)
-
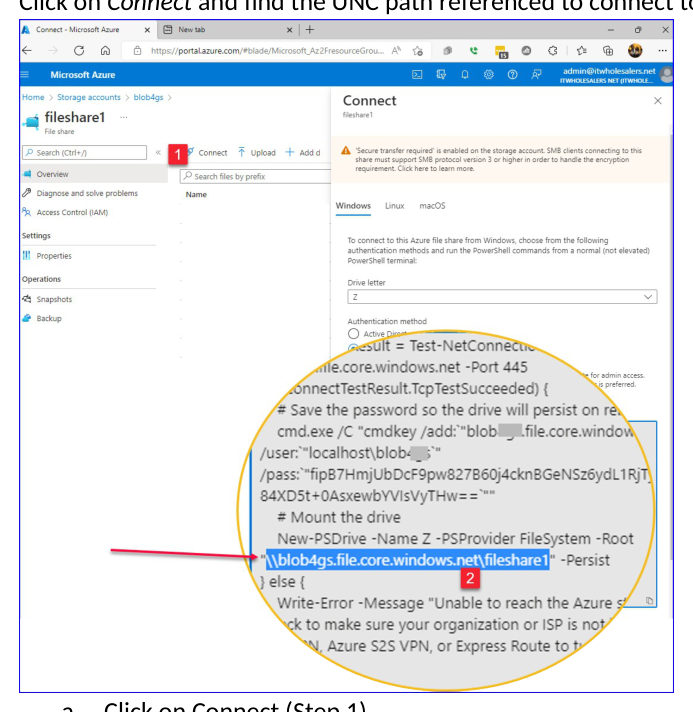
Click on Connect and find the UNC path referenced to connect to the selected Azure File Share
-
Click on Connect (Step 1)
-
Copy the path that displays the path to the Azure File Share (Step 2)
\StorageAccount.file.core.windows.net\FileShareName
- Now that we have collected all the needed details to connect to the Azure File Share. Let’s create the job. Select the New Job button from the Jobs section.

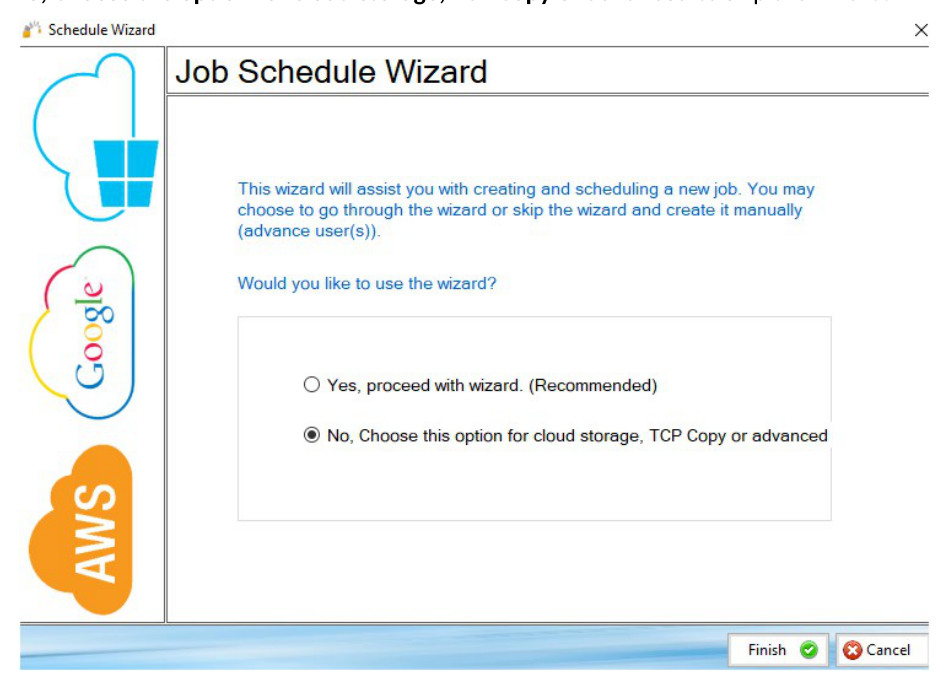
- No, Choose the option for cloud storage, TCP Copy or advanced to skip the wizard.
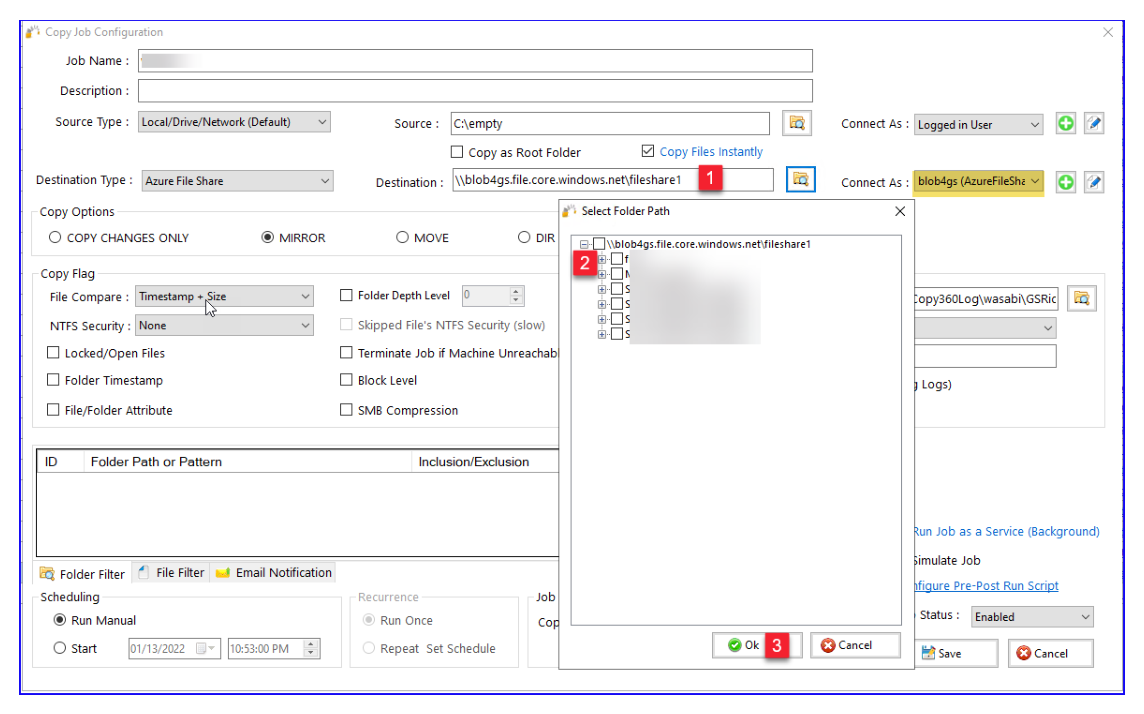
- Select the Destination Type to be Azure File Share (Step 1).

-
Click on the + sign to add the Azure File Share account to connect with (Step 2).
-
Give the account an alias name (label) (Step 3)
-
Provide the Storage Account Name and Key1 and verify it (Step 4)
-
Type the path to the Azure File Share and click test (Step 5 and 6) to confirm the connection is successful– This is optional
-
Save the Job (Step 7)
-
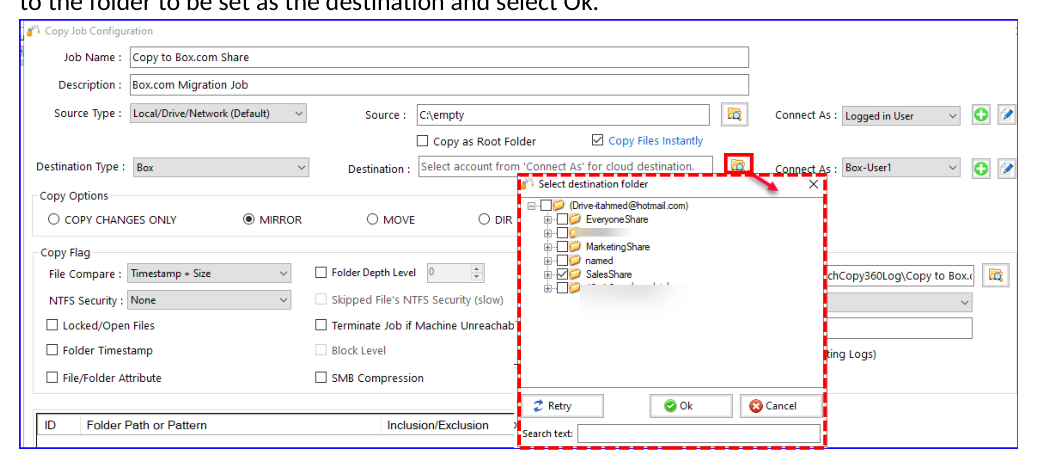
Type Azure File Share path in the destination. You can click on the browse button to display the available destination folders. Check the box next to the folder to be set as the destination and select Ok.
- You can now create the rest of the job by choosing the copy options you want as you would in a normal job.
Note: The credentials are stored in an encrypted format. This means that you can run uninterrupted as well as run as a service. You do not have to provide credentials for this job again unless you change the key that is being used or the job does not run for a long time which may be longer than the validation period of the token.
Microsoft Azure Blob Storage
Copying to Azure Blob Storage is straight forward. However, it is essential to note that Azure Blob Storage is known to use network bandwidth excessively. Fortunately, GS RichCopy offers the option the throttle the bandwidth being used to copy to cloud providers. Make sure to visit that section to Cloud Bandwidth Throttling.
To configure a job to copy to Azure Blob Storage, you will need the following from the Access Keys for that storage account:
-
Storage Account Name
-
One of the two keys.
Here is a screenshot of where you can obtain them from the Azure Portal for reference.

 Creating a job to copy to Azure Blob Storage:

-
Select New Job button from the Jobs section.
-
Select No, Choose this option for cloud storage, TCP Copy or advanced to skip the wizard.
-
Fill out the required fields (job name, source), select Cloud, choose AzureBlob, click on the Plus Sign next to the Authorization, follow the steps below and click Save.
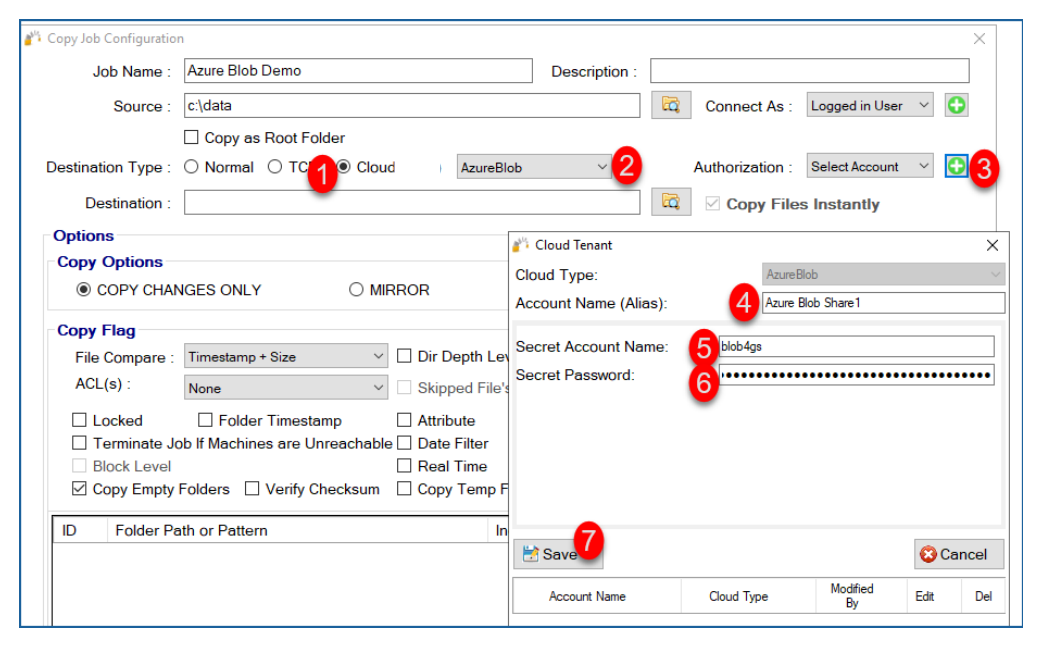
 - Then click on the browse button next to the Destination. A list of folders will be displayed. Click on the check box where you want to copy the data to and click Ok.
- You can now proceed with creating the rest of the job by choosing the copy options you want as you would in a normal job.
Note: The credentials are stored in an encrypted format. This means that jobs could run uninterrupted as well as run as a service. You do not have to provide credentials for this job again unless you change the key that is being used.
DropBox Cloud
 Follow these simple steps to copy to DrobBox Personal/Business Cloud.
-
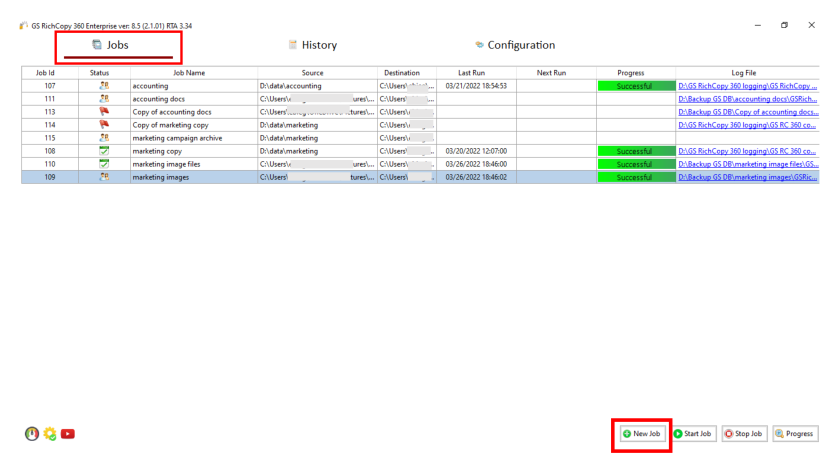
Select New Job button from the Jobs section.
-
Select No, Choose the option for cloud storage, TCP Copy or advanced to skip the wizard.

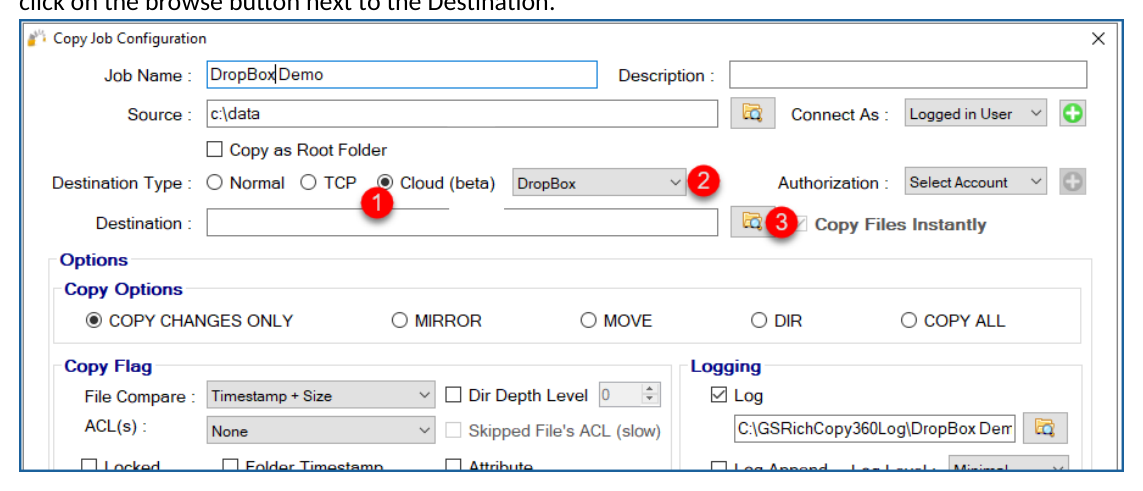
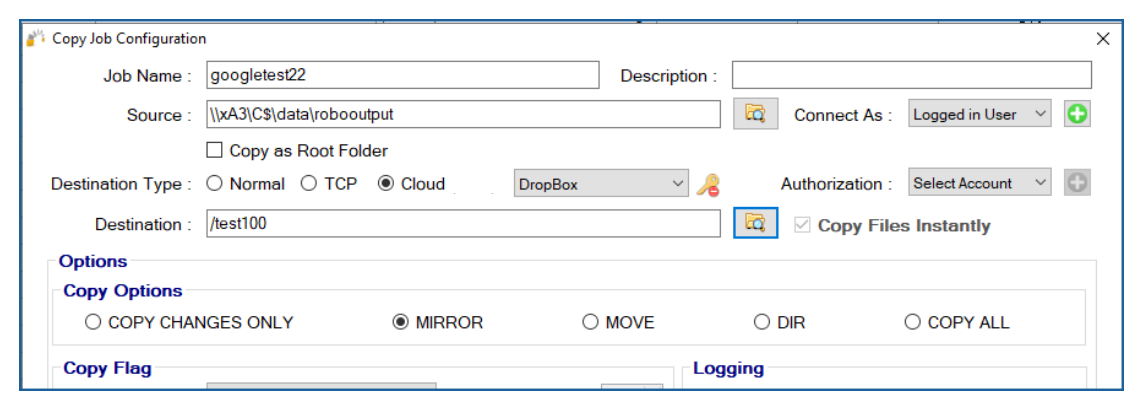
- Fill out the required fields (job name, source) and then select Cloud and choose DropBox. Then click on the browse button next to the Destination.
-
A browser window should open and prompt you for your DropBox credentials. Provide them and logon.
-
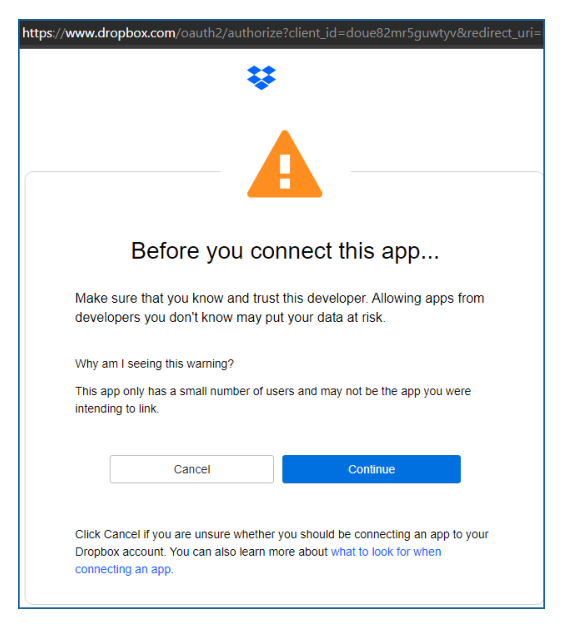
A warning prompt will ask you to confirm access of GS RichCopy 360 to the DropBox resource. Click Continue.
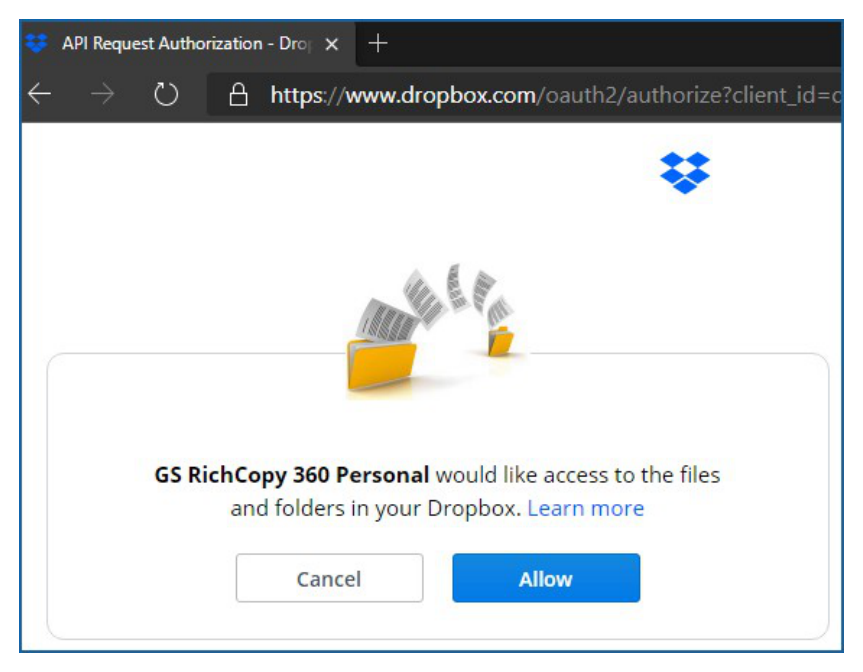
- Another window may request that GS RichCopy 360 be granted access to your files and folders. Click Allow to continue.
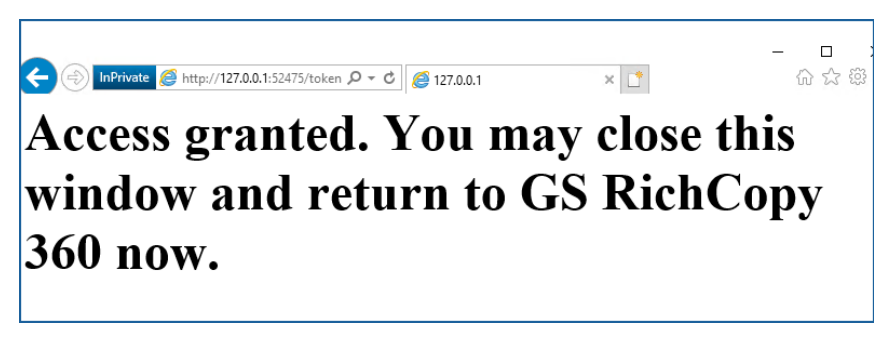
- A confirmation screen confirming that GS RichCopy 360 has been granted the access it needs to enumerate and connect to your account. Close that window and go back to the job configuration screen to select a destination folder.
- Select a destination folder and click OK.
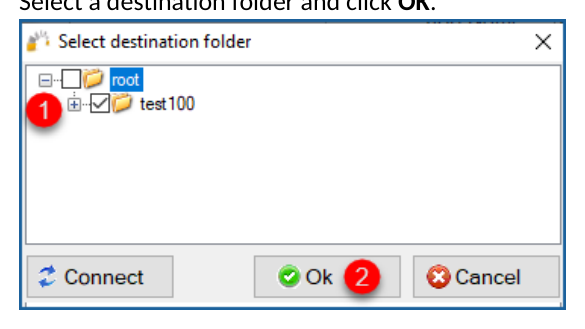
- Your destination path should now auto-populate with the folder you selected to copy to.
- You can now create the rest of the job by choosing the copy options as you would in a normal job.
Note: The credentials are stored in an encrypted format. This means that jobs can run uninterrupted and run as a service. You do not have to provide credentials for this job again unless the job is idle for 8 to 12 months.
Box.com - Cloud
Follow these simple steps to copy to Box.com (for enterprise clients, you could the same steps to copy from Box.com).
- Select the New Job button from the Jobs section
- Select No, Choose the option for cloud storage, TCP Copy or advanced to skip the wizard.

-
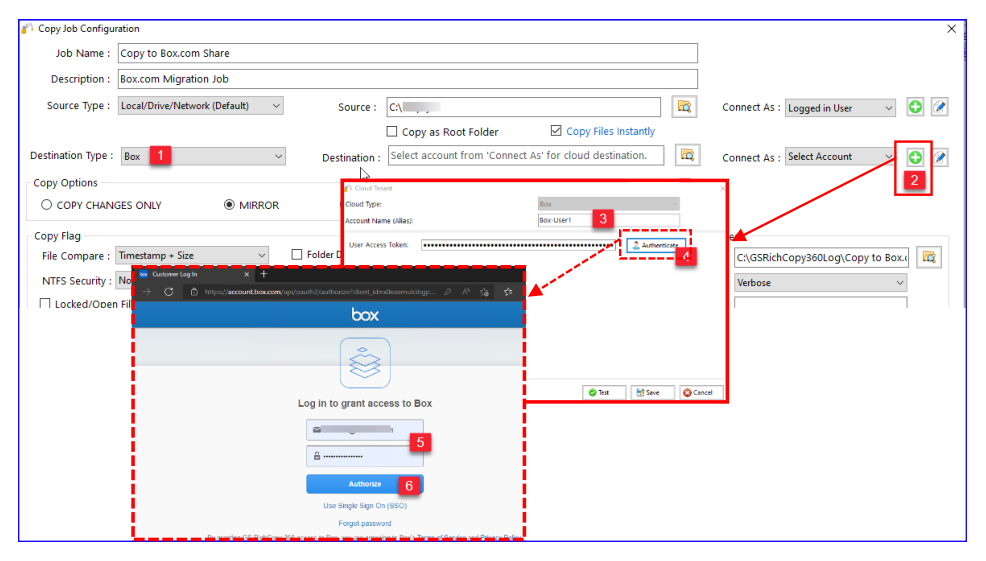
Select the Destination Type to be Box (Step 1).
-
Click on the + sign to add the Box account to connect with (Step 2).
-
Give the account an alias name (a label) (Step 3)
-
Click on Authenticate (Step 4)
-
Login with the Box user credentials to be used (Step 5)
-
Click on Authorize (Step 6) and follow the prompts to grant the access needed
-
Click on Save to save the credentials.
- Click on the browse button to display the available destination folders. Select the checkbox next to the folder to be set as the destination and select Ok.
- You can now create the rest of the job by choosing the copy options you want as you would in a normal job.
Note: The credentials are stored in an encrypted format. This means that jobs can run uninterrupted as well as run as a service. You do not have to provide credentials for this job again unless you change the key that is being used or the job does not run for a long time which may be longer than the validation period of the token.
Amazon S3 Cloud
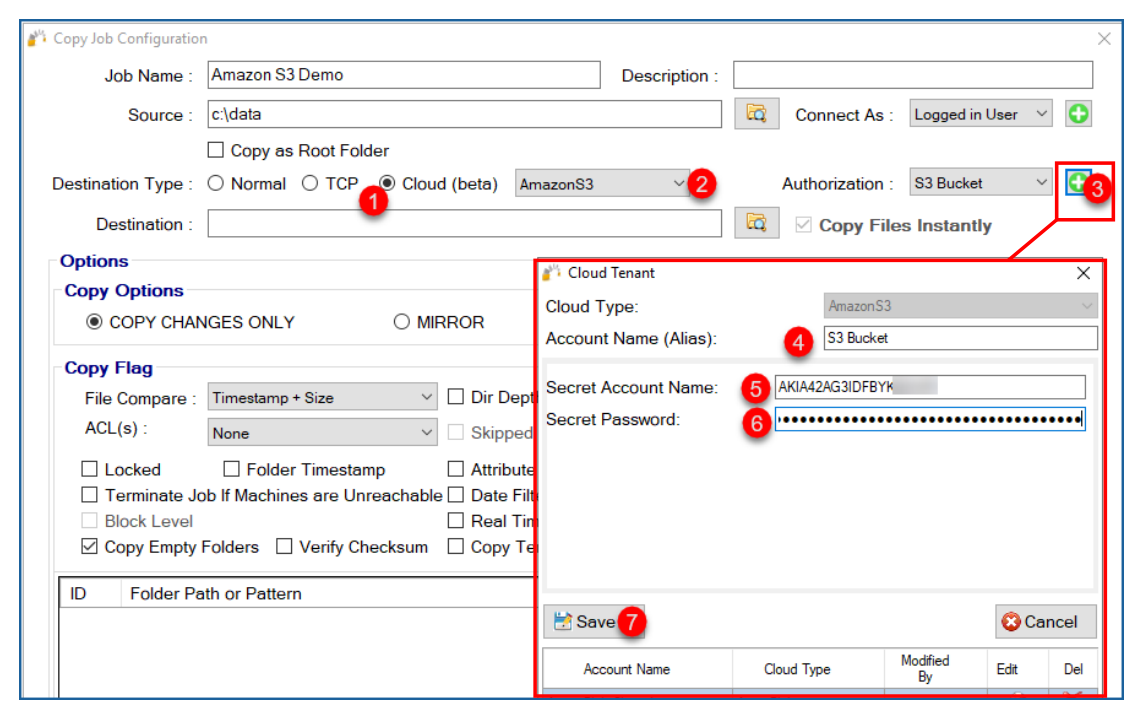
 Copying to the Amazon S3 account requires the Access Key and the Secret Access Key for either the root account or an IAM user with proper rights and API access to the S3 bucket.
Note: it is very important to note that Amazon S3 is known to use network bandwidth excessively. Fortunately, GS RichCopy offers the option the throttle the bandwidth being used to copy to cloud providers. Make sure to visit that section to Cloud Bandwidth Throttling.
Steps for creating a job to copy to Amazon S3:
-
Select the New Job button from the Jobs section.
-
Select No, Choose the option for cloud storage, TCP Copy or advanced to skip the wizard.
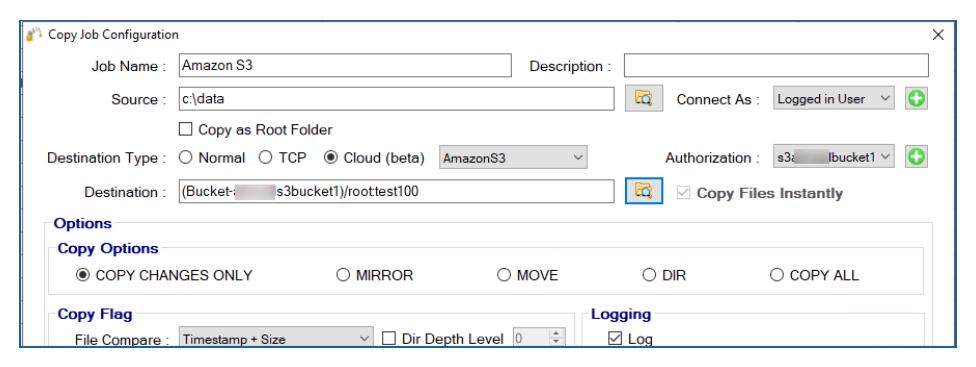
- Fill out the required fields (job name, source) and then select Cloud and choose Amazon S3. Then click on the Plus sign next to Authorization to add the credentials.
- Click on the browse button next to Destination and select your destination folder and click OK.
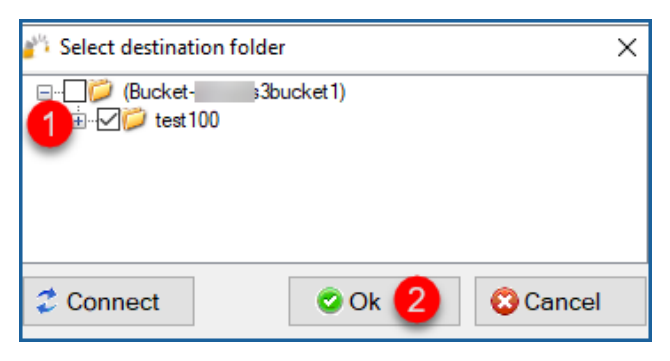
- Your destination path should auto-populate with the folder you selected to copy to.
- You can now create the rest of the job by choosing the copy options as you would in a normal job.
Note: The credentials are stored in an encrypted format, allowing jobs to run uninterrupted as
well as run as a service. You do not have to provide credentials for this job again unless you change the key that is being used.
S3 Compatible Storage - Cloud
Follow these simple steps to copy to any S3 Compatible storage providers (Clients with GS RichCopy 360 Enterprise can also copy from any S3 Compatible storage providers.
- Select the New Job button from the Jobs section.
- Select No, Choose the option for cloud storage, TCP Copy or advanced to skip the wizard.

-
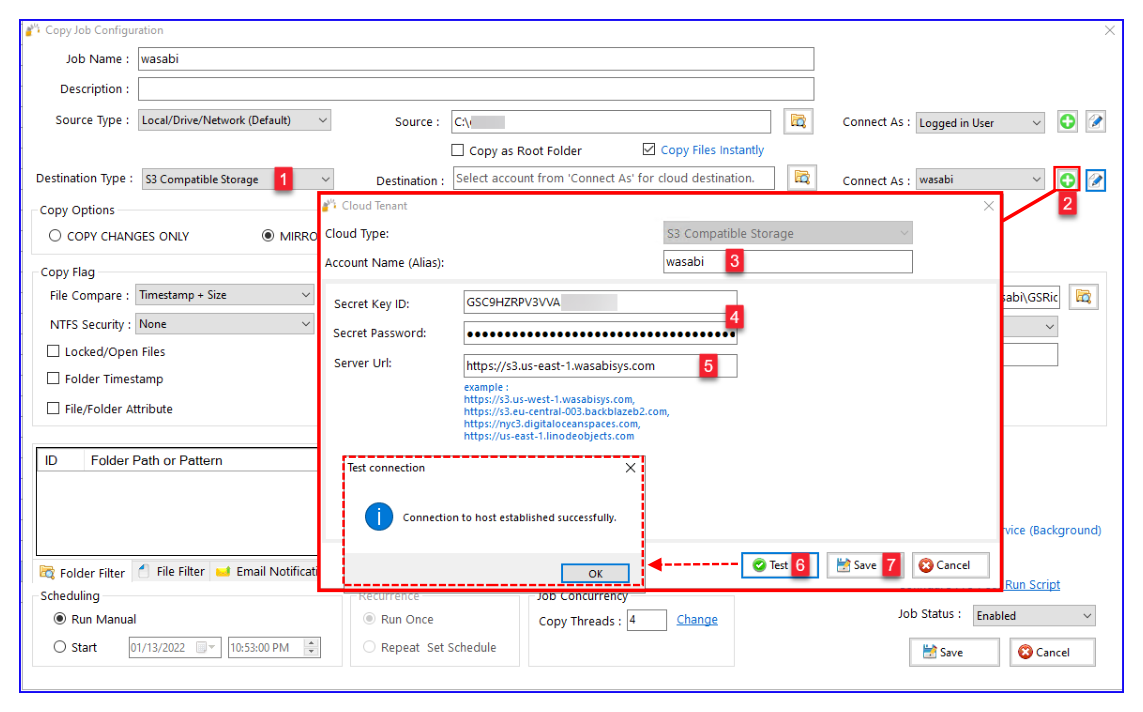
Place holder. Select the Destination type to be S3 Compatible Storage (Step 1).
-
Click on the + sign to add the S3 Compatible Storage account to connect with (Step 2).
-
Give the account an alias name (label) (Step 3)
-
Provide the Secret Key ID and Secret Password (Step 4)
-
Specify the S3 Endpoint. This is provided by the S3 Storage Provider (Step 5)
-
Click on Test to test the credentials and confirm the connection is successful (Step 6) This is optional.
-
Click on Save to save the credentials.
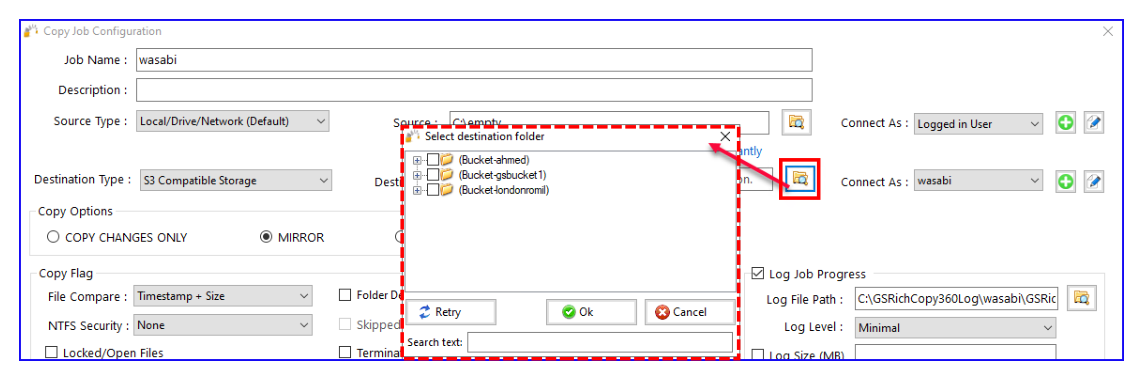
- Click on the browse button to display the available destination folders. Check the box next to the folder to be set as the destination and select Ok.
- Place holder. You can now create the rest of the job by choosing the copy options you want as you would in a normal job
Note: The credentials are stored in an encrypted format. This means that jobs will run uninterrupted as well as run as a service. You do not have to provide credentials for this job again unless you change the key that is being used or the job does not run for a long time which may be longer than the validation period of the token.
Google Drive Cloud
 Follow these simple steps to copy to Google Drive Personal\ Business Cloud.
-
Select the New Job button from the Jobs section.
-
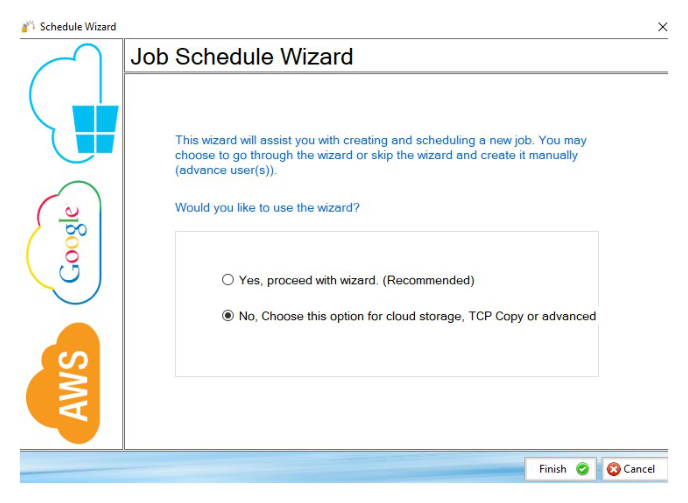
Select No, Choose the option for cloud storage, TCP Copy or advanced to skip the wizard.

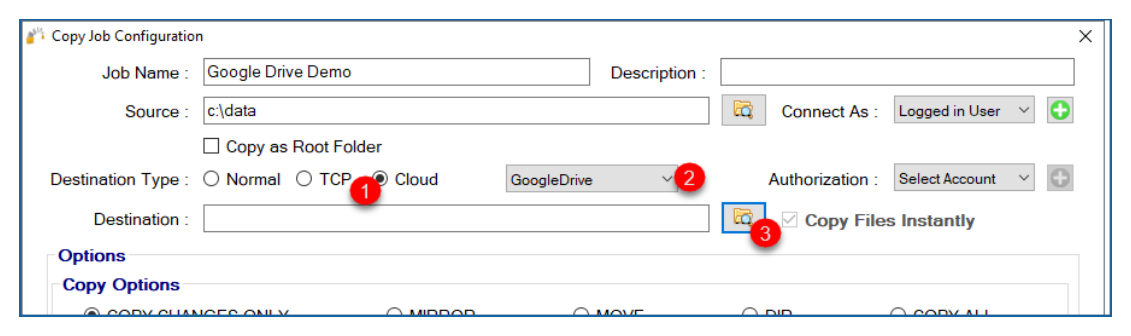
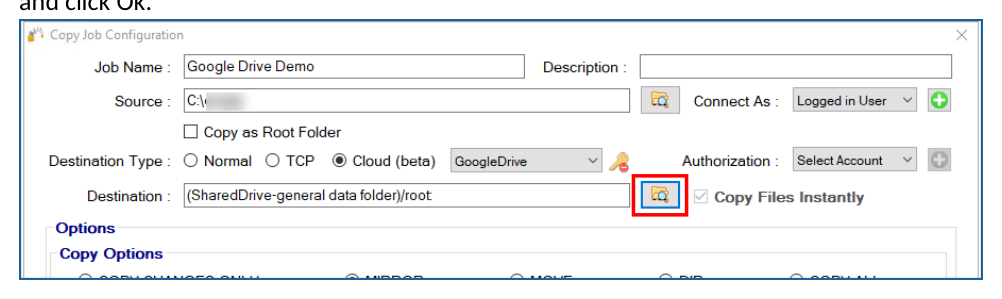
- Fill out the required fields (job name, source) and then select Cloud and choose GoogleDrive Then click on the browse button next to the Destination.
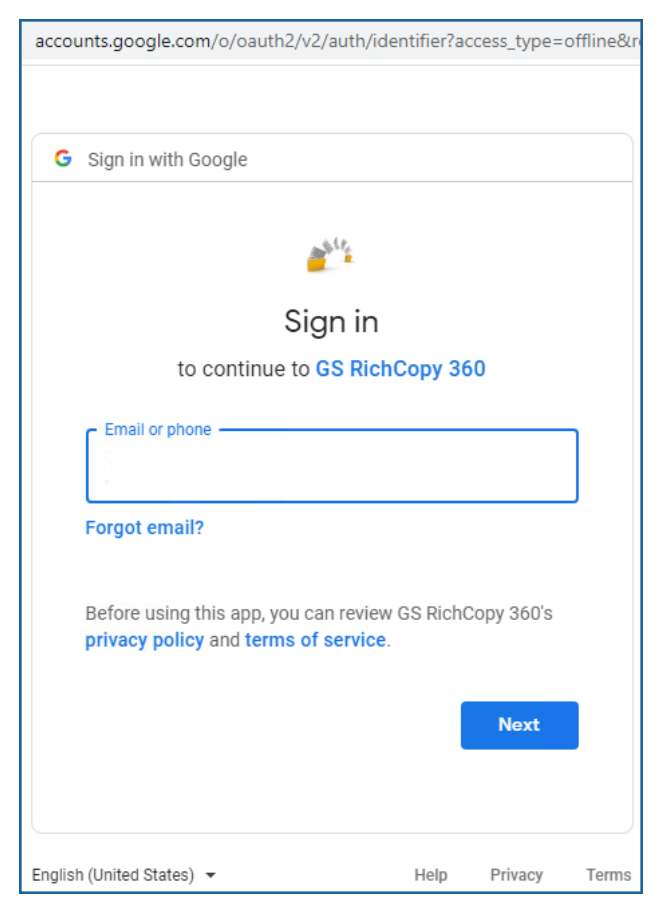
- A browser window should open and prompt you for your DropBox credentials. Provide them and logon.
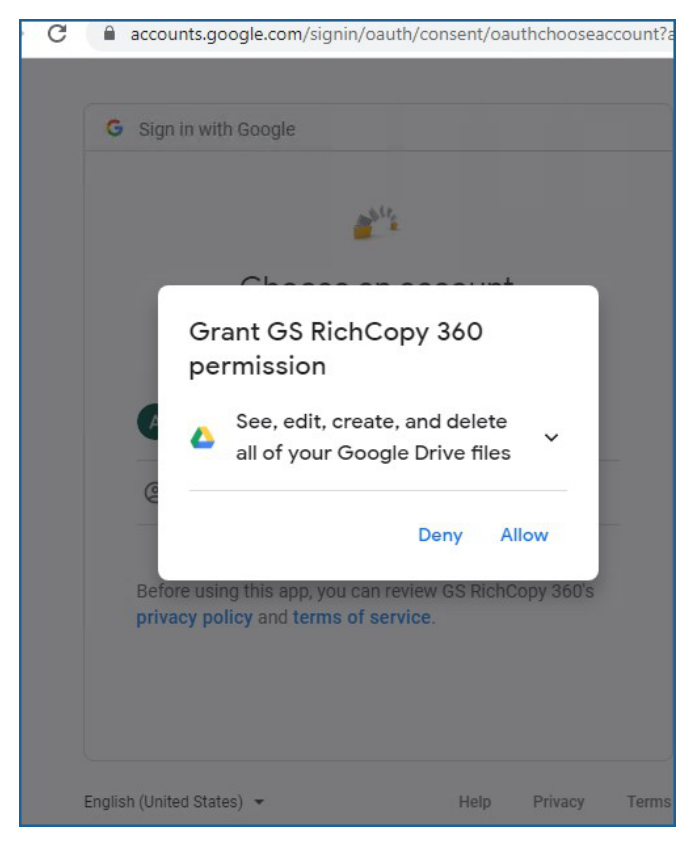
- Click on Allow for GS RichCopy 360 to proceed forward with this process.
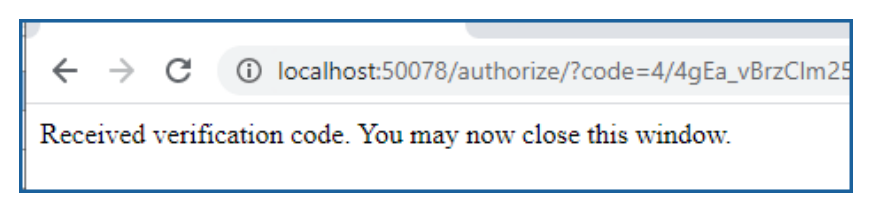
- You should get confirmation that access to the application has been verified. At this point you can close that window and go back to select the destination folder.
- Select the Browse button next to Destination field, select the folder that you want to copy to and click Ok.
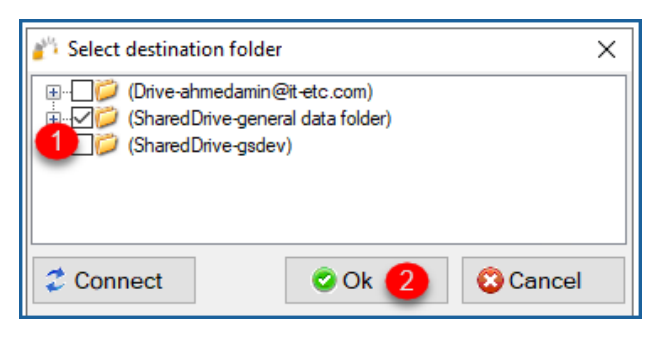 8. Your destination path should now auto-populate with the folder you selected.
- You can now create the rest of the job by choosing the copy options you want as you would in a normal job.
Note: The credentials are stored in an encrypted format, allowing jobs to run uninterrupted as
well as run as a service. You do not have to provide credentials for this job again unless you need to change the key that is being used.
Copy Files to Nasuni
Migrating data to Nasuni filers can be optimized using the advanced destination options in GS RichCopy 360 Enterprise. Follow the instructions below to copy files to Nasuni
- Select the New Job button from the Jobs section.

- Select No, Choose the option for cloud storage, TCP Copy or advanced to skip the wizard.
-
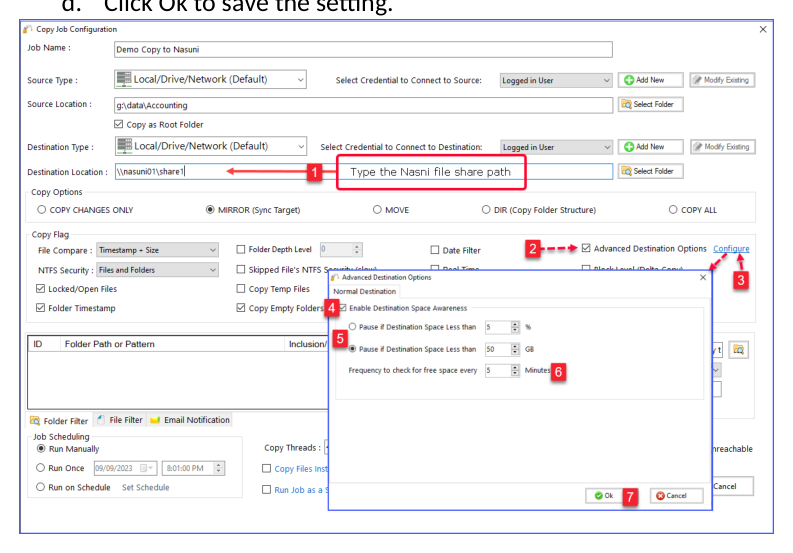
Fill in the required details and specify the Nasuni file share path in the destination field and select the Advanced Destination Options to enable the cache awareness option as per the screenshot below. To make GS RichCopy 360 Enterprise aware of Nasuni filer cache:
-
Enable the options and set the threshold.
-
Select the metric of the threshold and set the threshold number. Threshold can be monitored by percentage of available free space or by size in gigabytes.
-
Then set the frequency to check the free space in minutes.
-
Click Ok to save the setting.
- The job can now be saved and run to start the migration to Nasuni.
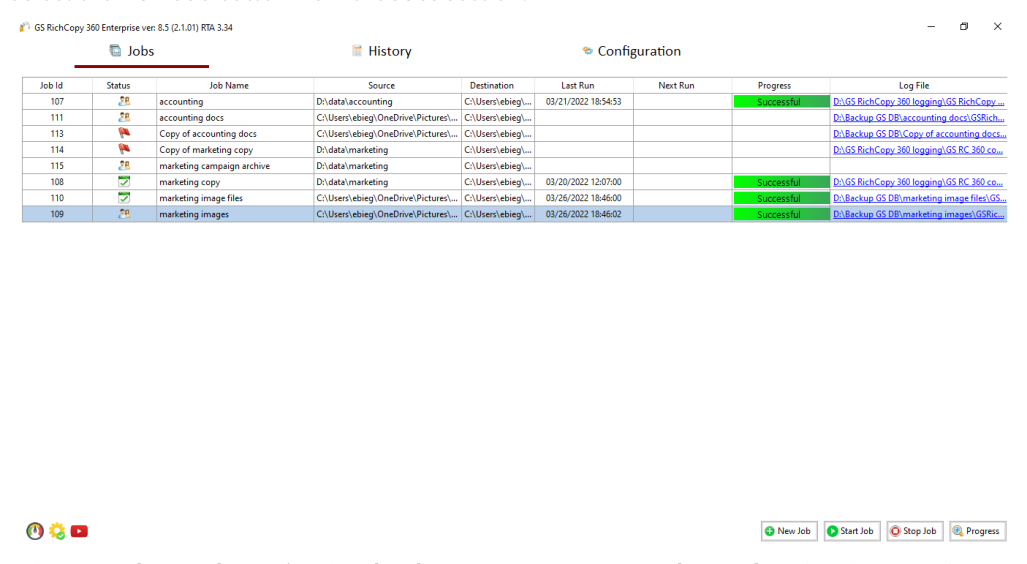
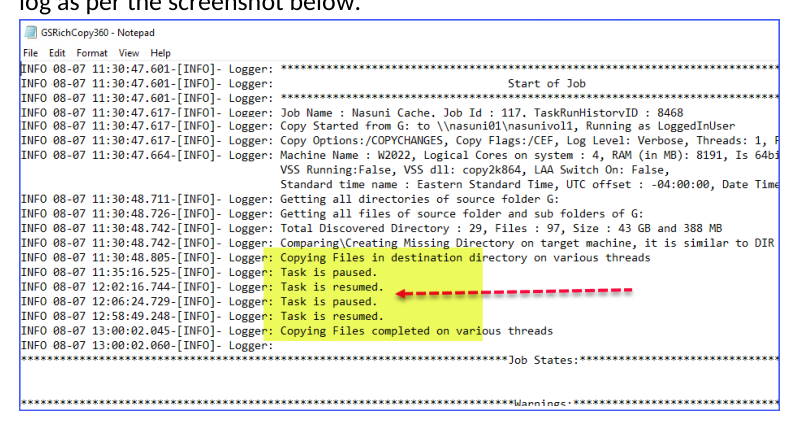
Note: given that the advanced destination option is now set to monitor Nasuni cache free space, once the cache is full, the job will pause and periodically check Nasuni filer’s cache free space. Once the cache is freed up again (Nasuni completed the snapshot), then the job should resume automatically. This will continue until the job is finished. The job log should show every time the job pauses and resumes in the log as per the screenshot below.